
Mirror Isles · Creator’s Room 3
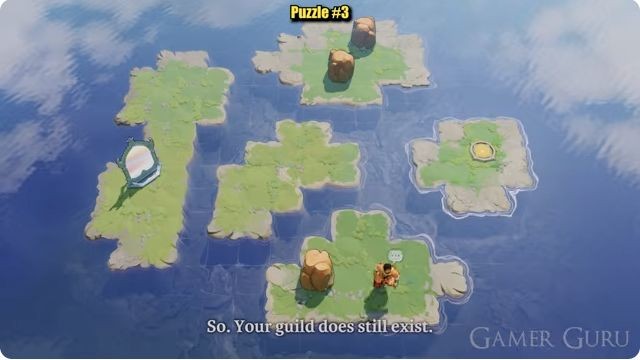
Two northern rocks and an eastern gold circle
Match the five-island layout, two northern rocks and western mirror. The gold circle is on the small eastern island; choose a hint when you want the route.
Different layout? Compare the other Mirror Isles rooms.
Mirror Isles rooms
- 1. The first mirror: reach the southwest island
- 2. Two mirrors and an eastern exit
- 3. Two northern rocks and an eastern gold circle
- 4. The northwest gold circle and one rock
- 5. Four islands, three rocks and an eastern exit
- 6. The tiny northwest exit island
- 7. Two rocks between three islands
- 8. The bent island and southwest exit
- 9. Two upper mirrors and two lower circles
- 10. Two mirrors above a row of three circles
- 11. A pink rock, a western mirror and five islands
- 12. Snow, a gold rock and the northwest green circle
- 13. Pink rock and dark block on the long arm
- 14. Snowy hook-shaped land and two dark pillars
- 15. Three snowy islands and two pink rocks
- 16. Three amber rocks around a white gap tile
- 17. Two mirrors, a northern island and an eastern exit
- 18. Three mirrors and the western purple circle
- 19. Two western mirrors and a northeast bend
- 20. Two mirrors, a purple crystal and an eastern exit
- 21. One island, a purple crystal and two circles
- 22. Four purple crystals and two distant circles
- 23. Four red crystals and the western circle island
- 24. Two green crystals and a bent metal walkway
- 25. Two mirrors, red crystals and an eastern crossing
- 26. Two figures, a brown rock and two northern circles
- 27. Two western figures and one eastern circle
Choose how much help you want
Stop after any hint. The full route and later-state picture stay hidden until you open them.
Hint 1What to notice
Start by reaching the mirror island. Moving its mirror north opens a reflected landing on the island holding the two rocks.
Hint 2What to set up
The two rocks do different jobs. One makes a northern bridge; the other must cross it before making a western bridge.
Hint 3The decisive move
Once both bridges are ready, bring the mirror down the western island and east onto the central island. Its final position must line up with the eastern exit.
Open the full routeSolution spoilers and the target state
Reach the northern rocks
Walk north from the starting island across the existing stone to the central island. Stand in the western mirror’s horizontal light and transfer onto its island. Move the mirror north along the long western island. Stand east of it and transfer when the reflection is on the northern rock island.
Make the northern bridge
Push the lower northern rock south into the gap to the central island. It becomes the flat stone between those islands. The second rock remains upright on the north island at this point.
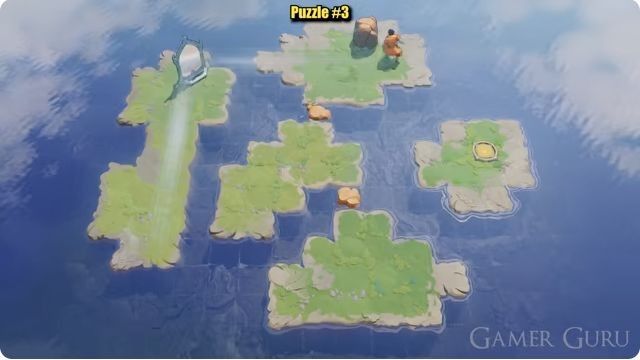
Only the first rock is flat in the north–central gap; the second is still upright on the northern island. Enlarge image Bring the second rock to the west gap
Move the remaining northern rock into the new bridge’s column and push it south over the flat stone onto the central island. Go around it on the central island and push it west into the water gap towards the mirror island. This second rock becomes a different bridge, joining central and west.
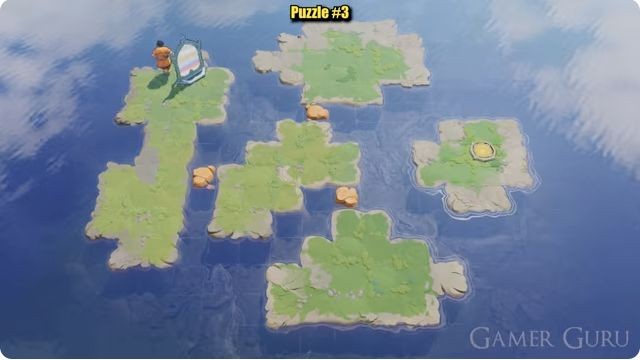
The second rock now forms the west–central bridge, while the character has returned to the western mirror. Enlarge image Bring the mirror onto the central island
Cross the new western bridge and return to the mirror at the north end of the western island. Move it south along that island to the bridge’s row, then east across the stone onto the central island. Move it to the central island’s eastern side, with its horizontal light aligned to the small eastern exit island.
Use the southern light for the final transfer
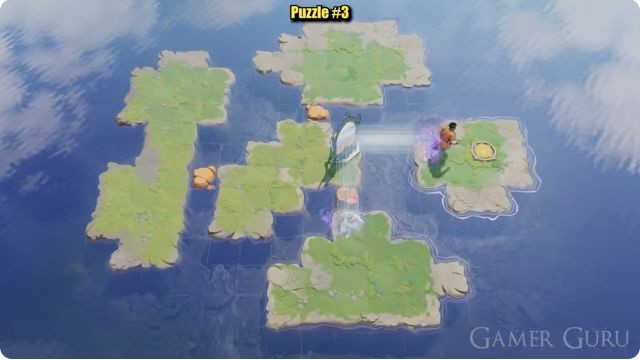
Go south onto the starting island and stand in the mirror’s vertical light. Adjust your position until the reflection is on the eastern gold-circle island, then transfer and reach the circle. The recording shows the completion transition before Room 4.
Check your result
One flat stone joins north to central and another joins west to central. The mirror remains on the central island’s eastern side when the character reaches the eastern gold circle.
If your attempt went wrong
Do not throw both northern rocks into the same gap. Keep the first as the north–central bridge and push the second over it while still upright, then west into the other gap. If the mirror cannot move onto the central island, inspect that western bridge.
Watch this room in the original recording ↗
Opens YouTube in a new tab. No video or third-party player loads here.
Source: Gamer Guru’s original Room 3 demonstration. Use directions relative to the board image and your game’s displayed mirror controls. Routes and completion signals were read from this October 2026 recording; its exact patch is unknown, and these are not personal current-build or r67255 tests. Hints and explanations by Sinking Star Hub. Report a layout mismatch.