
North · The Hearty Heroes of Hauling
Heroes of Hauling
Find the matching board and hero, then open a hint or the full solution. The red hero pushes crystals, the green hero pulls them, and the purple-robed hero swaps places with an aligned crystal. The final six-goal puzzle brings additional companions onto the same board.
Left, right, up and down refer to the pictures. Use your game’s displayed controls. The same two-pillar board appears in Puzzles 1, 5 and 9 with a different hero and route.
Puzzle 1 · Red hero · push
1. Push through the two-pillar corridor
Two stone pillars divide a narrow corridor. A blue crystal blocks the lower passage at the left pillar; a purple crystal blocks the upper passage at the right pillar. The red hero starts on the left.
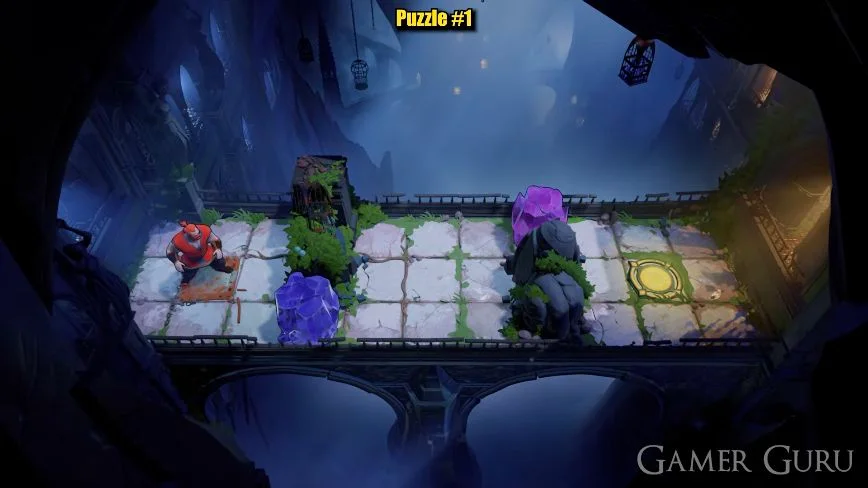
Hint 1What to notice
Look for the passage beneath the left pillar before approaching the purple crystal.
Hint 2What to set up
Move the blue crystal first; the upper route lets you approach the purple crystal from its left.
Hint 3The decisive move
Push both crystals to the right, then leave through the circle beyond the right pillar.
Full solution for Puzzle 1Moves, checkpoints and the exit
Clear the lower passage
From the left entrance, push the blue crystal right along the lower passage until it sits before the right-hand pillar. This opens a way beneath the left pillar.
Use the upper passage
Walk around through the middle space to the upper passage. Push the purple crystal right to the far end, then walk down onto the gold exit circle.
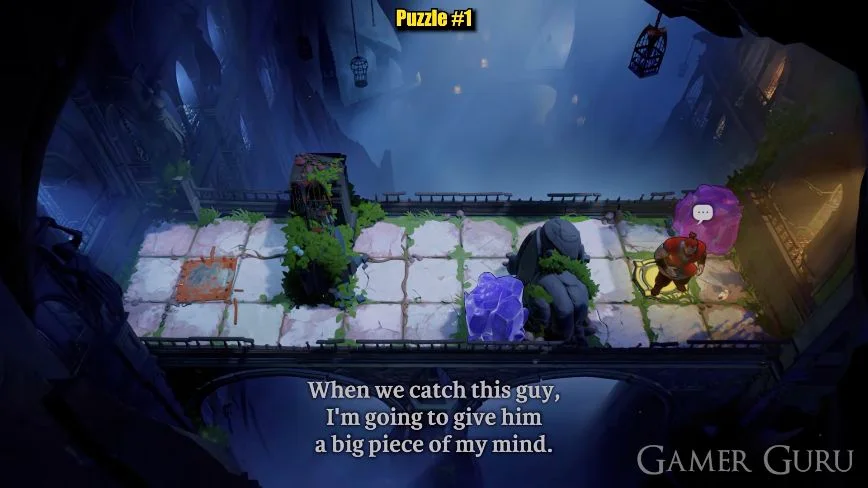
Check your result
The red hero reaches the circle to the right of the pillars, with both crystals moved out of the walking route.
If your attempt went wrong
If the blue crystal still blocks the left pillar, return to that first push before trying the upper route.
Watch Puzzle 1 in the original recording ↗
Opens YouTube after you follow the link. No player loads here.
Puzzle 2 · Red hero · push
2. Free the lower exit through two corridors
Two long rooms are joined on the right. Chains of blue and purple crystals fill their narrow passages; the exit circle is at the lower left.
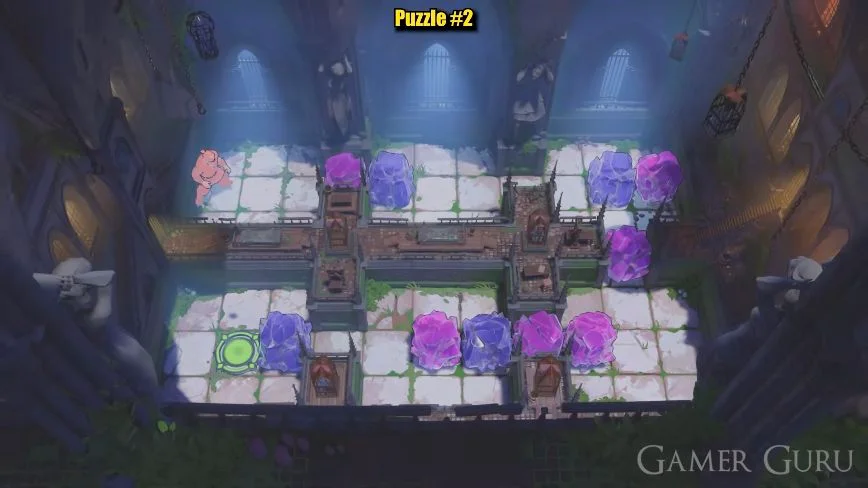
Hint 1What to notice
The upper chain must move before you can enter the right connector.
Hint 2What to set up
The connector crystal needs to move down and then back up; its final position alone hides this useful temporary move.
Hint 3The decisive move
Clear the lower room from the right, then lift the crystal off the lower-left circle.
Full solution for Puzzle 2Moves, checkpoints and the exit
Cross the upper room
Push the upper purple-and-blue chain right to the end of the middle room. Walk below the pair and push the blue crystal up one square to pass beneath the tower.
Make space in the connector
Push the purple crystal in the right connector down. Walk around its right side to get below it, then push it back up into the connector. This temporary down-and-up move frees room to work below.
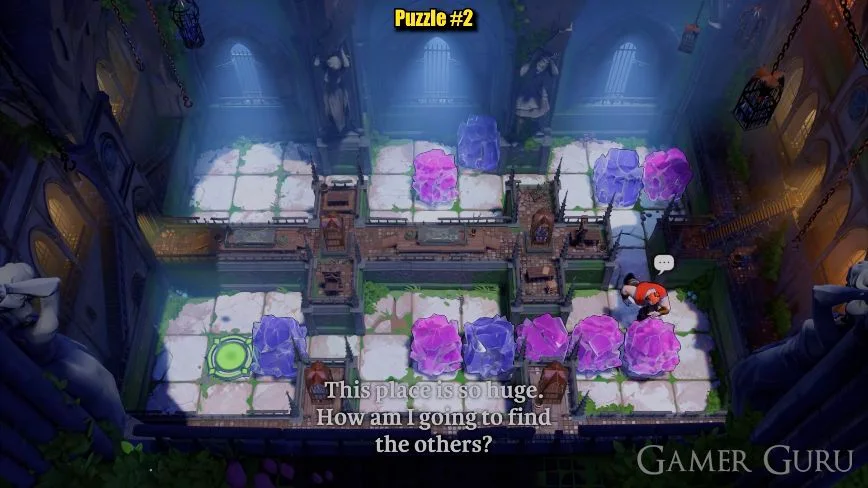
The right connector’s purple crystal has first been pushed down to make turning space Enlarge image 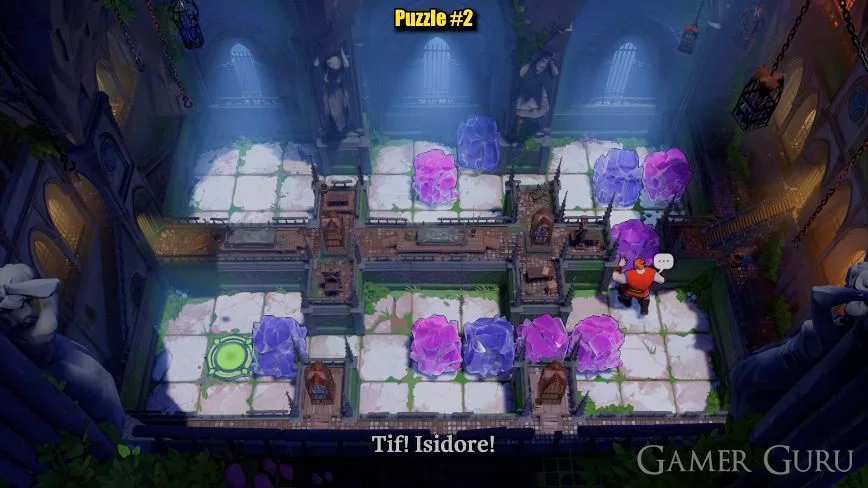
After walking around it, the red hero pushes the connector crystal back up Enlarge image Work back through the lower room
Push the lower room’s rightmost purple crystal up. From the right, push the remaining purple-blue-purple chain left to the narrow opening. Walk below the middle blue crystal and push it up; shift the loose purple crystal on its right one square right.
Uncover the circle
Push the exit-side purple-and-blue pair farther left to the boundary. Walk below the purple crystal covering the circle and push it up, then step onto the circle.
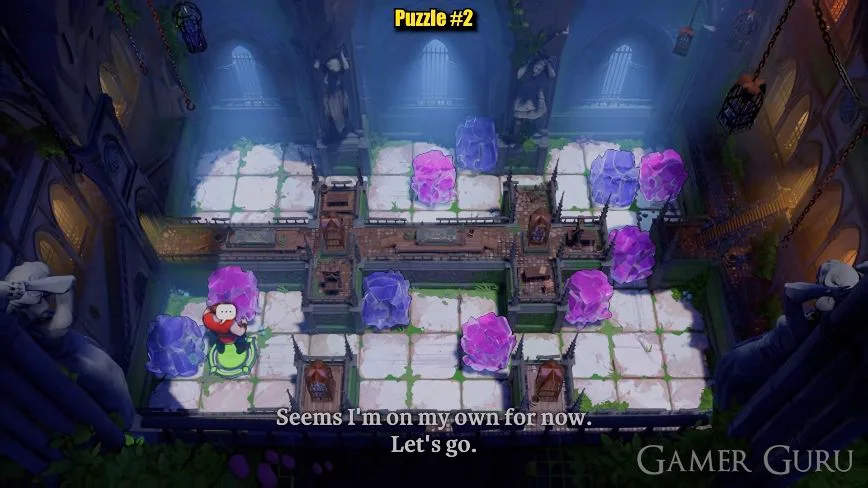
Check your result
The lower-left circle is uncovered and the red hero stands on it.
If your attempt went wrong
If the lower room is too crowded to approach a crystal, check that you made both connector moves, down and back up.
Watch Puzzle 2 in the original recording ↗
Opens YouTube after you follow the link. No player loads here.
Puzzle 3 · Red hero · push
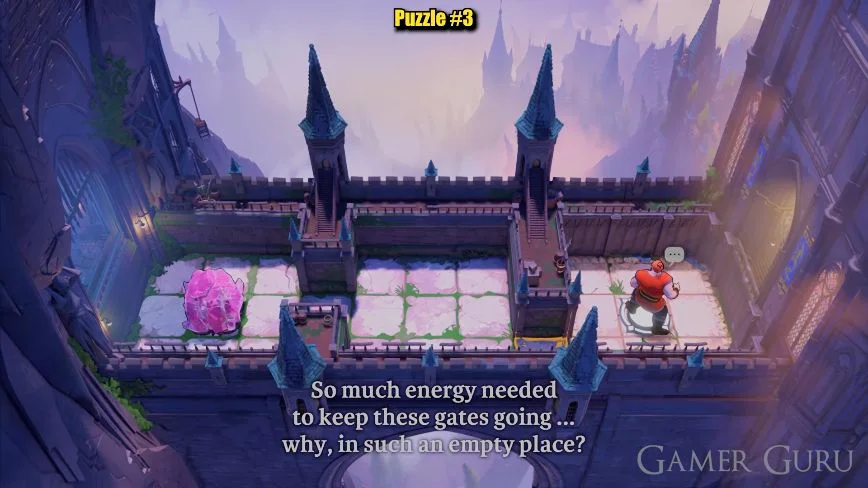
3. Hold the left plate to open the right gate
One purple crystal sits in the central passage. A pressure plate is at the far left, and a yellow gate separates the passage from the circle on the right.
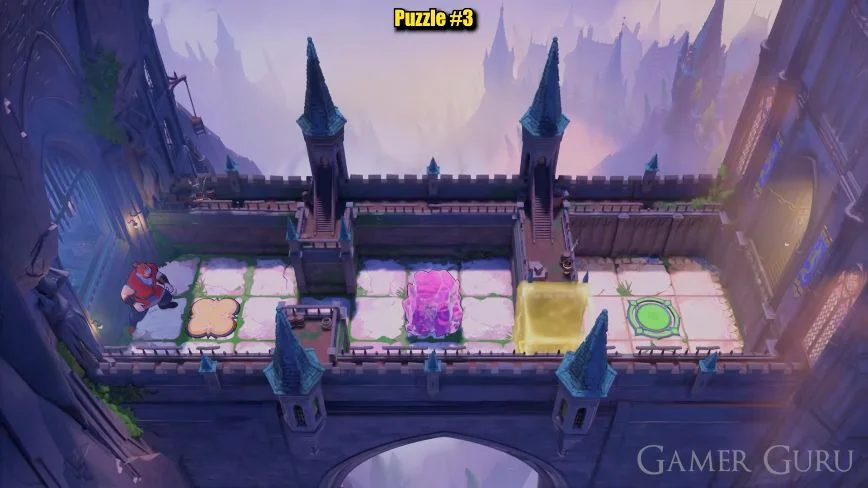
Hint 1What to notice
The crystal belongs on the plate, not beside the exit.
Hint 2What to set up
Approach the crystal from its right-hand side.
Hint 3The decisive move
Push it all the way left onto the plate and leave it there while you walk right.
Full solution for Puzzle 3Moves, checkpoints and the exit
Load the plate
Walk around to the right side of the purple crystal. Push it left along the central passage until it rests on the pressure plate.
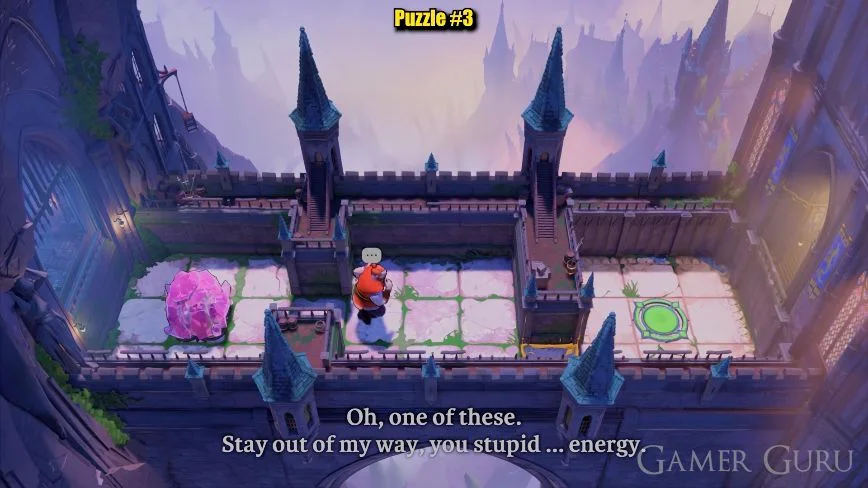
The purple crystal holds the left plate and the right-hand gate is open Enlarge image Leave through the gate
Once the right-hand gate lowers, leave the crystal on the plate. Walk back to the right, pass through the open gate and step onto the circle.
Check your result
The crystal remains on the left plate and the hero reaches the circle beyond the right gate.
If your attempt went wrong
Do not push the crystal toward the circle; the gate needs the plate to stay occupied.
Watch Puzzle 3 in the original recording ↗
Opens YouTube after you follow the link. No player loads here.
Puzzle 4 · Red hero · push
4. Fill the three plates from right to left
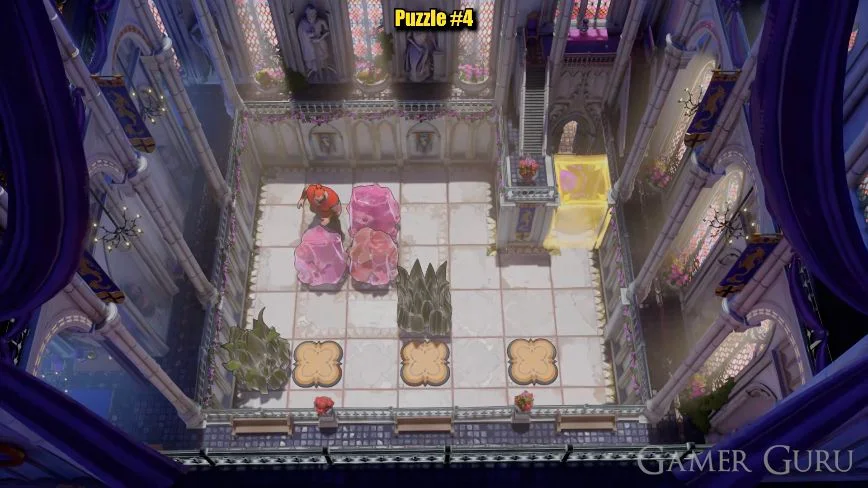
Three crystals sit above three lower pressure plates. A central spiked block limits the approach; the exit is above the gate on the right.
Hint 1What to notice
Set up the farthest plate before filling the nearby one.
Hint 2What to set up
Move the top purple crystal to the right of the central spikes before sending it down.
Hint 3The decisive move
Fill the right plate, then the middle plate, then the left plate.
Full solution for Puzzle 4Moves, checkpoints and the exit
Fill the right plate
Push the top purple crystal right until it is to the right of the central spiked block. Get above it and push it down to the bottom row, then approach from the left and push it right onto the right plate.
Fill the middle plate
Return above the orange crystal. Push it down to the bottom row, move to its left and push it right onto the middle plate.
Fill the left plate and exit
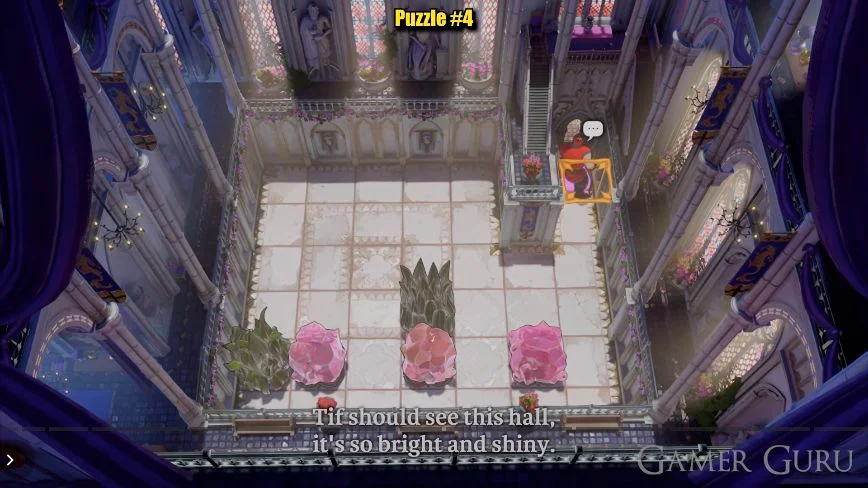
Push the remaining left purple crystal down onto the left plate. With all three plates occupied, walk around on the right and enter the upper-right circle.
Check your result
Three crystals hold three separate plates, the gate is open and the red hero reaches the upper-right circle.
If your attempt went wrong
If a crystal blocks access to another, undo to the setup before loading the left plate and use the right-to-left order.
Watch Puzzle 4 in the original recording ↗
Opens YouTube after you follow the link. No player loads here.
Puzzle 5 · Green hero · pull
5. Pull across the two-pillar corridor
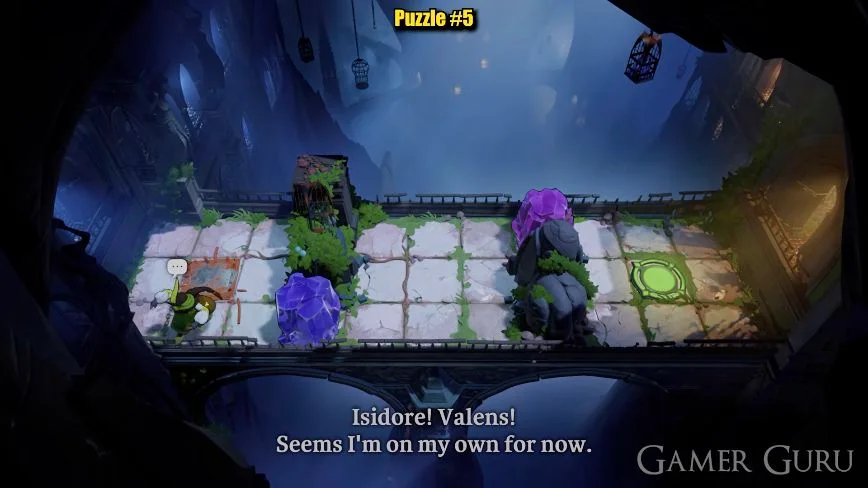
The two-pillar layout resembles Puzzle 1, but the hero wears green and pulls crystals while stepping backward. Use this route for the green hero, not the red pusher.
Hint 1What to notice
You need room to stand in front of each crystal and retreat.
Hint 2What to set up
Pull the blue crystal left first so that you can get to its right.
Hint 3The decisive move
Both crystals need a change of side: pull left to create room, walk around, then pull right.
Full solution for Puzzle 5Moves, checkpoints and the exit
Change sides at the blue crystal
Pull the lower-left blue crystal to the far left. Walk around its upper side to get to its right, then pull it right beneath the left pillar until you can walk up past the pillar.
Change sides at the purple crystal
Pull the purple crystal left from above the right pillar into the middle space. Walk below it to reach its right side. Pull it right past the pillar, then walk down onto the circle.
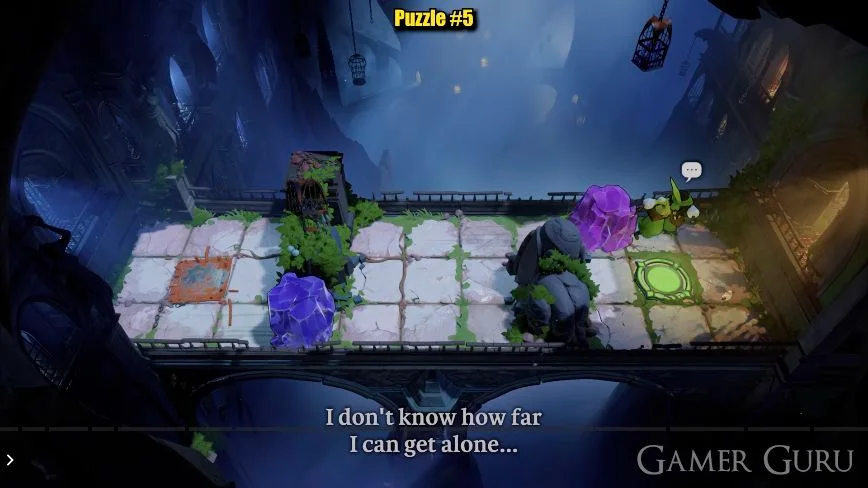
Check your result
The green hero is on the right side of the pillars and can enter the circle below the upper passage.
If your attempt went wrong
A red-hero pushing route will not solve this version. If you cannot retreat, first pull the crystal the other way to create space to walk around it.
Watch Puzzle 5 in the original recording ↗
Opens YouTube after you follow the link. No player loads here.
Puzzle 6 · Green hero · pull
6. Open the lower corridor and return left
Two crowded corridors connect on the right. The green hero starts in the upper-left room; a lower-right plate controls the gate to the lower-middle room.
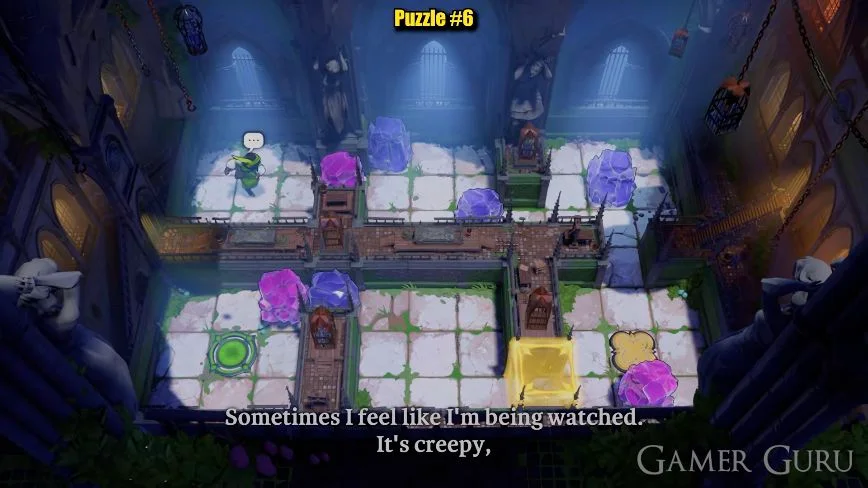
Hint 1What to notice
Pulling a crystal through a narrow opening may take a move away from the opening first.
Hint 2What to set up
Keep the lower-right purple crystal on the plate while arranging the lower-left return.
Hint 3The decisive move
The final blue crystal must move right and then down so you can change sides around the purple crystal.
Full solution for Puzzle 6Moves, checkpoints and the exit
Pass the upper-left opening
Pull the purple crystal left out of the upper-left gap. Walk around its upper side to reach the right, then pull it right back through the gap so that you cross into the next room.
Arrange the blue pair
In the upper-middle room, pull the left blue crystal down to the middle row and right one square. Pull the lower blue crystal on the right up one square. With both blue crystals beside each other in the middle row, walk below them and through the opening beneath the right tower.
Reach and hold the plate
Pull the upper-right blue crystal down into the connecting passage. Walk down, then pull the lower-right purple crystal up one square onto its pressure plate. Pass through the lowered gate into the lower-middle room.
Make the return path
Pull the blue crystal blocking the left opening right into the middle of the room, then down one square. Pull the left-room purple crystal right along the clear upper edge, to the square above that blue crystal. Walk around below the blue crystal to reach the purple crystal’s left side.
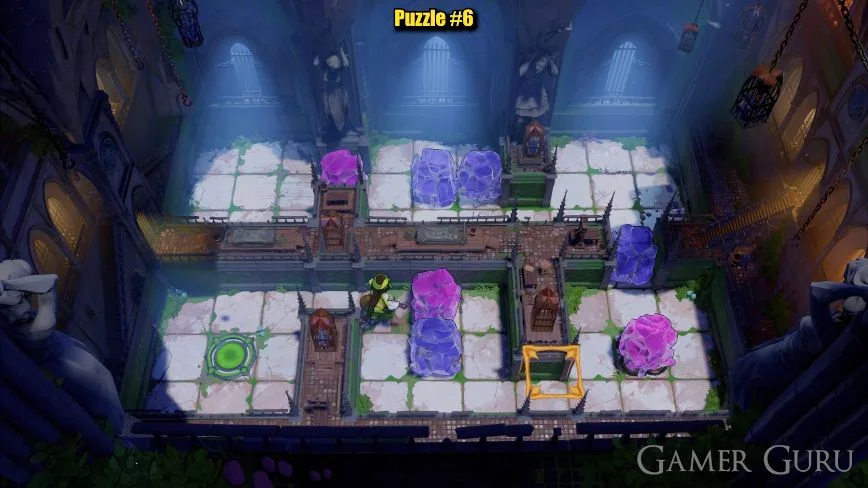
In the lower corridor, the green hero has walked around the lowered blue crystal to the purple crystal’s left side Enlarge image Leave at the lower left
Pull the purple crystal left back through the narrow opening. The green hero crosses with it and can walk down onto the lower-left circle.
Check your result
The lower-right purple crystal still holds the plate; the green hero has returned through the lower-left opening to the circle.
If your attempt went wrong
If you cannot get to the final purple crystal’s left side, check the blue crystal’s down move; its lower position creates the walking loop.
Watch Puzzle 6 in the original recording ↗
Opens YouTube after you follow the link. No player loads here.
Puzzle 7 · Green hero · pull
7. Loop around the courtyard to reach the plate
One purple crystal starts in a recess near the top of a large walled courtyard. A plate is right of center, two gates block the route, and the circle is at the upper right.
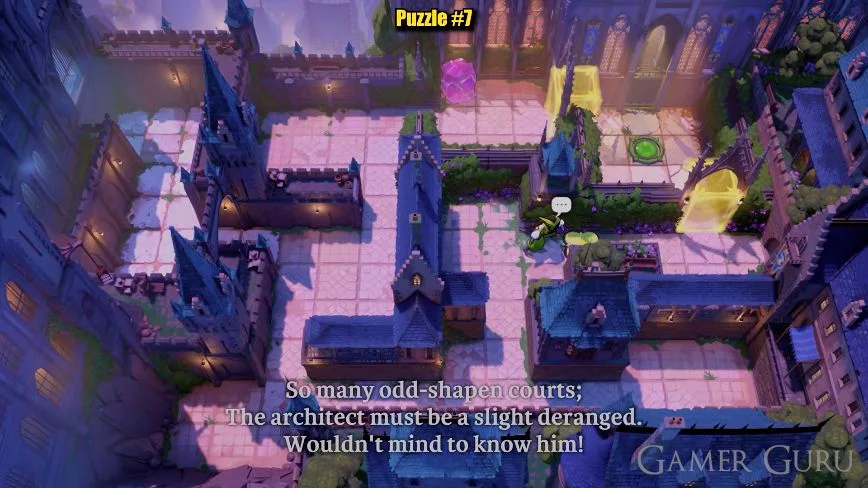
Hint 1What to notice
The crystal needs a long loop to let the pulling hero change sides.
Hint 2What to set up
Use the outer west corridor and the southwest pocket before attempting the right-hand plate.
Hint 3The decisive move
Bring the crystal through the bottom corridor to the southeast room, pull it back left into the central-right lane, then stand to the crystal’s right and pull right so the crystal enters the plate from the left.
Full solution for Puzzle 7Moves, checkpoints and the exit
Reach the crystal
From the right-hand start, walk down, follow the bottom edge left and go up the inner-left corridor. Pull the crystal down out of its upper recess to the cross passage, left to the inner vertical lane, down to the opening in the left tower, then left into the outer west corridor.
Turn around the west side
Pull it up the outer west corridor to the northwest corner, then left into the turning space. Walk around the crystal and pull it down the westernmost lane to the tower opening. Pull it right back into the inner-left room; this loop puts you on the side needed for the next descent.
Cross the bottom edge
Pull down to the foot of the L-shaped wall, then left into the southwest pocket. Walk below the crystal to its right and pull it right along the entire bottom corridor into the southeast room.
Bring it to the plate
Walk around to the crystal’s left side in the southeast room. Pull it left into the central-right vertical lane, then up to the plate’s row. Walk around to its right and pull it right onto the plate.
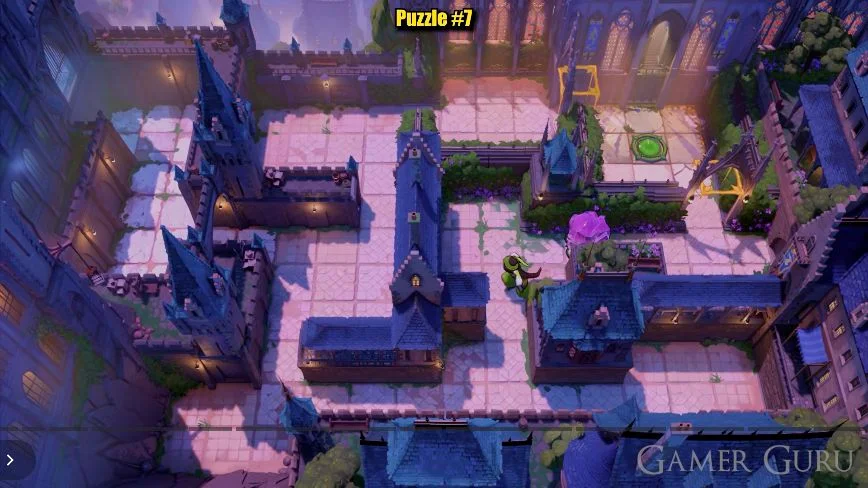
The purple crystal holds the central-right plate after its loop through the west and bottom corridors Enlarge image Use the opened gate
Leave the crystal on the plate. Walk around through the lower and right-hand spaces, pass up through the right gate and enter the upper-right circle.
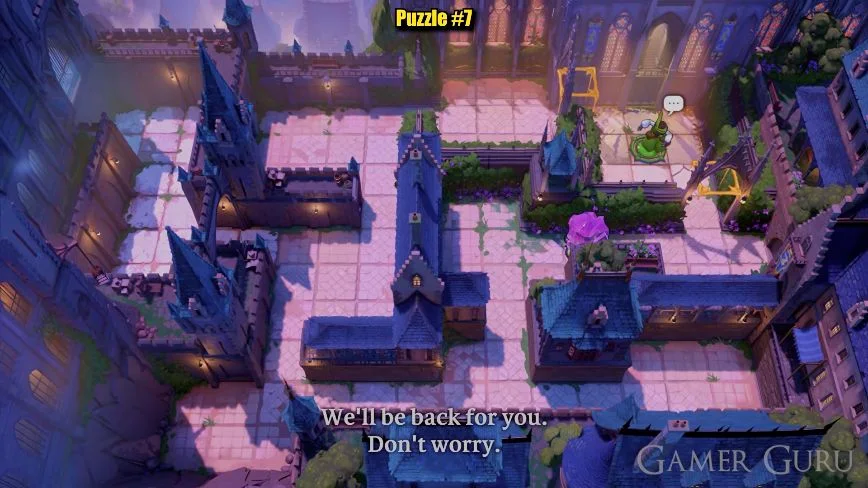
Check your result
The purple crystal stays on the central-right plate, both gates are lowered, and the green hero reaches the upper-right circle.
If your attempt went wrong
If a wall stops your next pull, retrace the relevant turning loop rather than trying to pull through the wall. The west loop and southwest pocket let you change sides.
Watch Puzzle 7 in the original recording ↗
Opens YouTube after you follow the link. No player loads here.
Puzzle 8 · Green hero · pull
8. Pull three crystals around the spikes
Three crystals must reach the lower-left, middle and right plates. Spikes are above the left and right plates and below the middle plate; the green hero pulls rather than pushes.
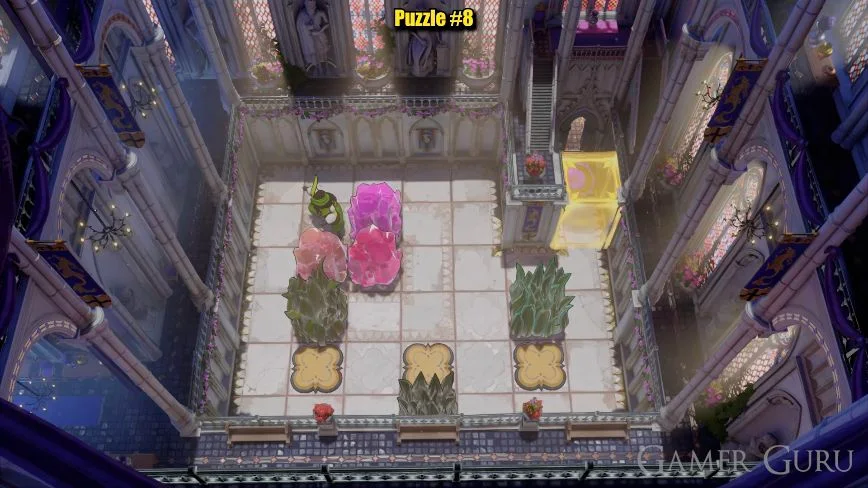
Hint 1What to notice
Free a vertical lane before moving the lower crystals.
Hint 2What to set up
The middle plate cannot be loaded by standing directly below it; that approach is spiked.
Hint 3The decisive move
Load the right plate first, pull the orange crystal onto the middle plate from its right, then finish with the left plate.
Full solution for Puzzle 8Moves, checkpoints and the exit
Free the shared lane
Pull the top purple crystal left one square, leaving its original column free.
Load the right plate
Stand below the lower-right red crystal and pull it down into the plates’ row. Walk around above it to its right, then pull it right onto the right plate.
Load the middle plate from the side
Pull the orange crystal right one square into the freed column, then down to the plates’ row. Walk around to its right and pull it right one square onto the middle plate. Do not approach from the spikes beneath the plate.
Load the left plate
Pull the top purple crystal right one square back into the clear column, then down to the plates’ row. Walk around below it to its left and pull it left one square onto the left plate.
Walk to the circle
With all three plates occupied and the gate lowered, follow the open space around the right side to the upper-right circle.
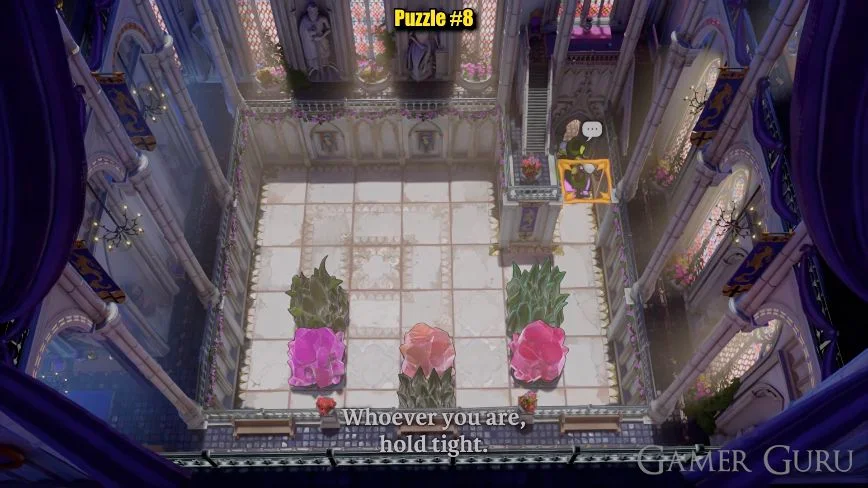
Check your result
The red, orange and purple crystals hold the right, middle and left plates respectively; the green hero reaches the upper-right circle.
If your attempt went wrong
If a spike blocks your retreat, undo the attempted approach and use the side of the plate shown in the route.
Watch Puzzle 8 in the original recording ↗
Opens YouTube after you follow the link. No player loads here.
Puzzle 9 · Purple-robed hero · swap
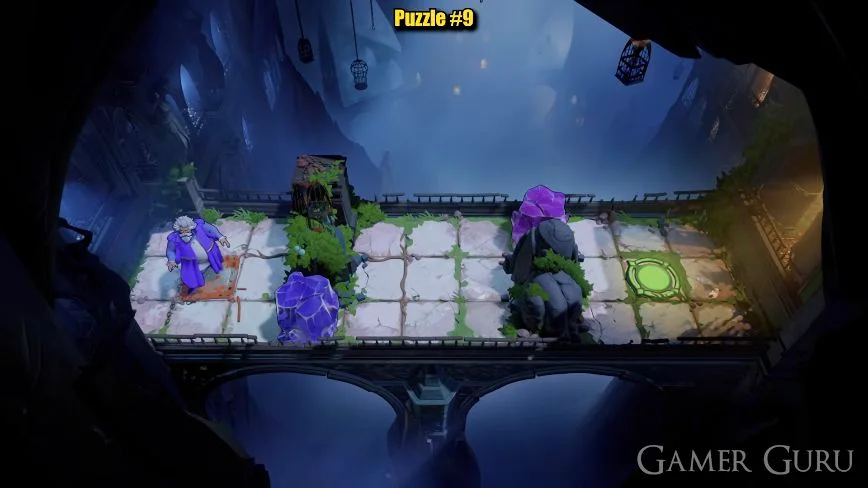
9. Swap through the two-pillar corridor
The same two pillars and two crystals appear again, now with a purple-robed hero. This hero exchanges places with an aligned crystal; neither the red pushing route nor the green pulling route applies.
Hint 1What to notice
Think about where the hero will land after an exchange.
Hint 2What to set up
The lower blue crystal can take the hero across the first obstruction.
Hint 3The decisive move
Swap right with blue, walk to the upper passage, then swap right with purple.
Full solution for Puzzle 9Moves, checkpoints and the exit
Cross the first pillar
Stand in the lower passage facing the blue crystal. Swap right with it: the blue crystal remains at the left end and the hero lands beneath the left pillar.
Cross the second pillar
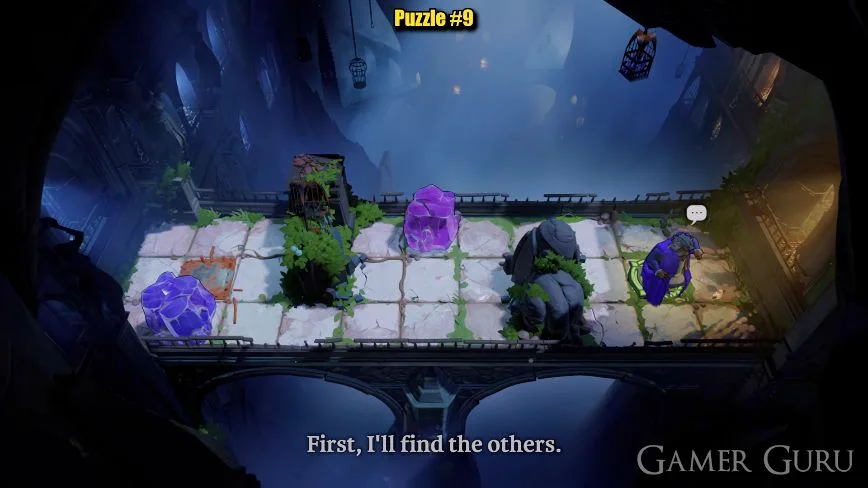
Walk into the middle space and up to the upper passage. Face right and swap with the purple crystal above the right pillar. Walk right and down onto the circle.
Check your result
The purple-robed hero reaches the right-hand circle after two exchanges, leaving the crystals behind.
If your attempt went wrong
Check both the board picture and the hero. Puzzle 1 and Puzzle 5 share this layout but use different actions.
Watch Puzzle 9 in the original recording ↗
Opens YouTube after you follow the link. No player loads here.
Puzzle 10 · Purple-robed hero · swap
10. Relay a crystal to the lower-right plate
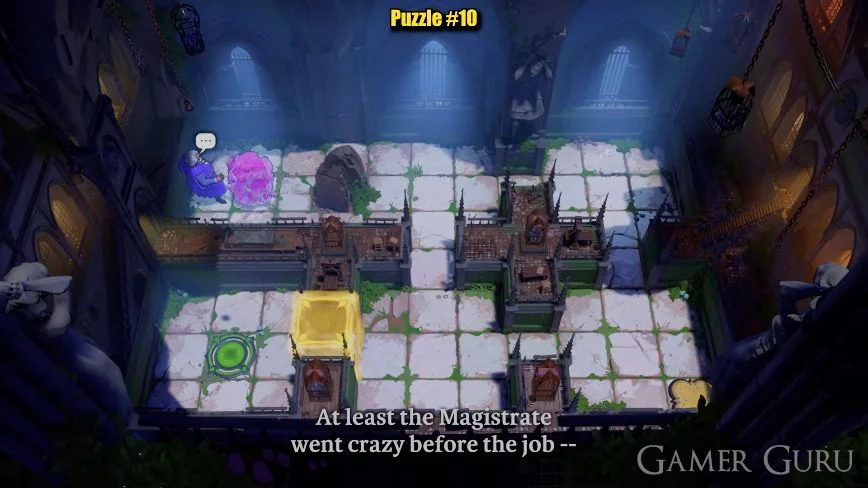
A single purple crystal starts in the upper-left room. A gray rock occupies the upper middle, the plate is at the lower right, and a gate protects the lower-left circle.
Hint 1What to notice
Each exchange moves the crystal to the hero’s old square.
Hint 2What to set up
Use the open upper and right-hand passages to reach the next useful swapping position.
Hint 3The decisive move
Bring the crystal into the lower-middle room, across to the right, then exchange from the plate itself.
Full solution for Puzzle 10Moves, checkpoints and the exit
Move the crystal into the central lane
Stand below the purple crystal and swap upward, leaving it along the lower edge of the horizontal wall. Walk above the gray rock to the top of the central vertical passage. Face left and swap, placing the crystal in that central lane.
Lower it into the middle room
Walk around through the upper and right-hand passages to the lower-middle room. Stand directly below the crystal, in the row connected to the lower-right room, and swap upward. The crystal moves down to your old square.
Bring it right and onto the plate
Go up the central passage and around the right side again. Stand immediately above the plate, face left and swap with the crystal. Circle around once more, approach the plate from below-left and stand on it. Swap upward with the crystal so that it occupies the plate.
Return to the left exit
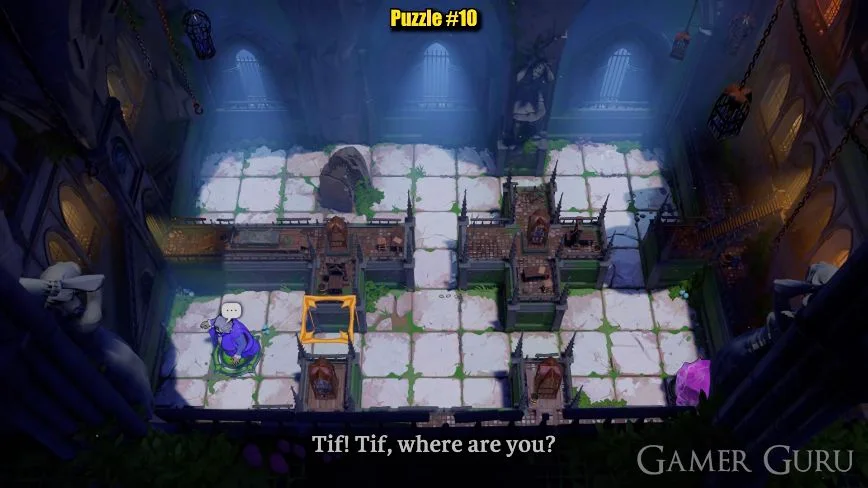
Leave the crystal holding the plate. Walk left along the lower-middle cross passage, through the lowered gate and onto the lower-left circle.
Check your result
The purple crystal holds the lower-right plate and the hero stands on the circle beyond the left gate.
If your attempt went wrong
Walk through the spaces cleared by each exchange. The crystal is not being dragged around corners or through walls.
Watch Puzzle 10 in the original recording ↗
Opens YouTube after you follow the link. No player loads here.
Puzzle 11 · Purple-robed hero · swap
11. Keep the left plate loaded while crossing the crystal grid
Eight crystals fill a grid in the main room. The lower-left square is a pressure plate; the gate and a separate orange crystal are at the upper right.
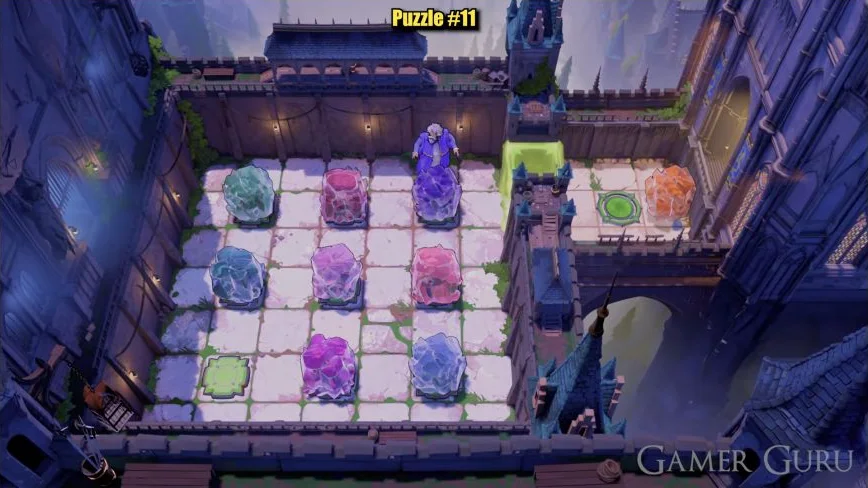
Hint 1What to notice
Simply standing on the plate will not keep the gate open when you leave.
Hint 2What to set up
Leave a crystal on the plate with the first exchange.
Hint 3The decisive move
Swap along the bottom row, then up the right column and across the gate to the orange crystal.
Full solution for Puzzle 11Moves, checkpoints and the exit
Leave a crystal on the plate
Walk left along the upper edge and down the left side to the lower-left plate. Face right and swap with the purple crystal in the middle of the bottom row. That crystal now holds the plate.
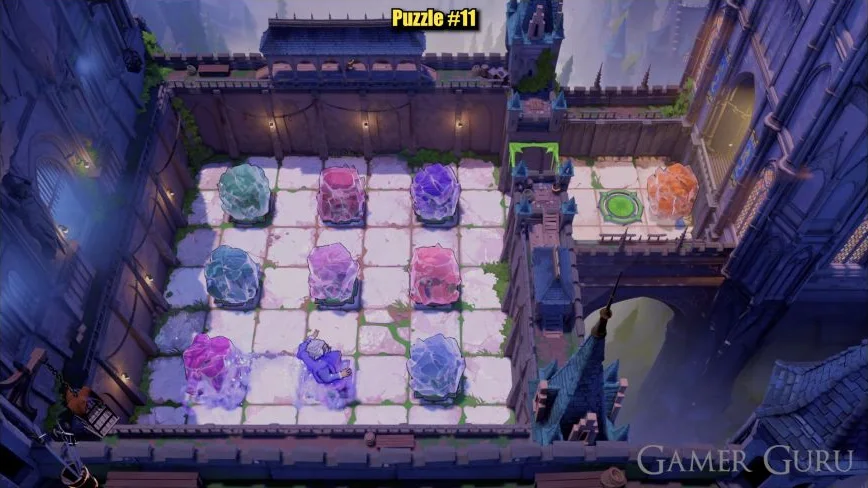
The first exchange leaves the purple crystal holding the lower-left plate Enlarge image Cross the crystal grid
Face right and swap with the bottom-right blue crystal. Face up and swap with the red crystal in the middle of the right column, then face up again and swap with the top-right purple crystal.
Cross the gate and exit
Face right and swap with the orange crystal outside the open gate. Walk down-left from the orange crystal’s former square onto the circle.
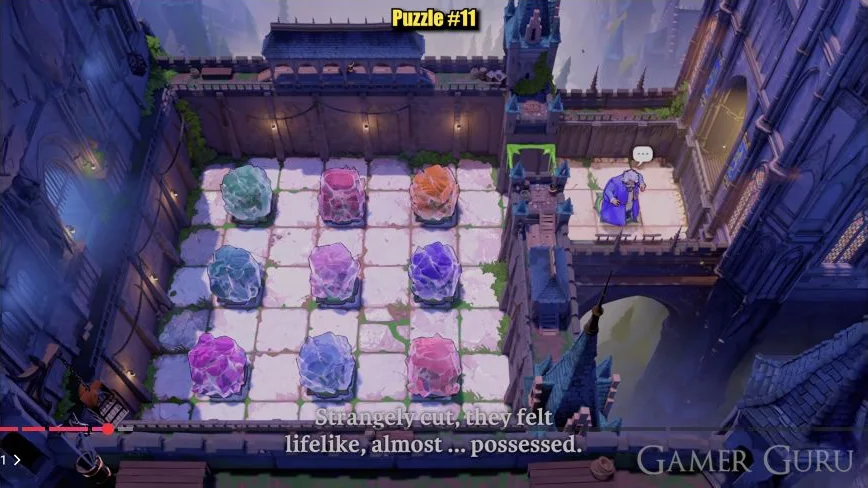
Check your result
A purple crystal still holds the lower-left plate and the hero reaches the circle in the separate right-hand area.
If your attempt went wrong
If the gate closes as you leave the plate, undo to the first exchange and make sure the purple crystal, not the hero, stays on the plate.
Watch Puzzle 11 in the original recording ↗
Opens YouTube after you follow the link. No player loads here.
Puzzle 12 · Purple-robed hero · swap
12. Relay three crystals onto three plates
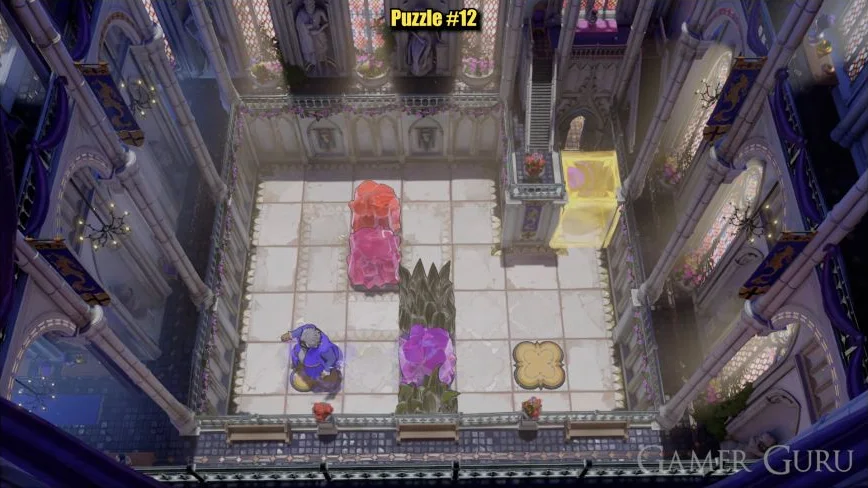
Purple and pink-red crystals stand beside each other, with an orange crystal above the pink one. Three plates line the bottom; obstacles above and below the middle plate restrict its approach.
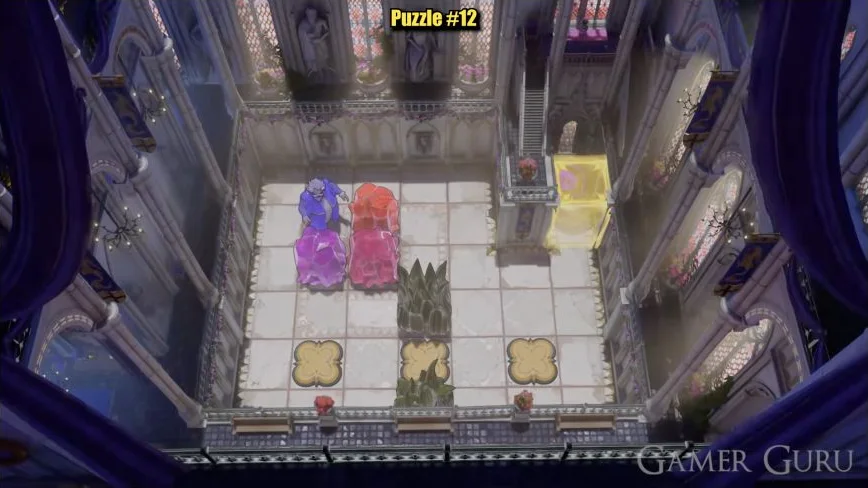
Hint 1What to notice
The left plate can be a temporary stop on the way to the middle one.
Hint 2What to set up
Use the purple crystal to load the middle plate, then reuse the left-hand approach for the pink-red crystal.
Hint 3The decisive move
Bring the orange crystal down a row, align it with the right plate, then exchange from that plate.
Full solution for Puzzle 12Moves, checkpoints and the exit
Relay purple to the middle plate
Walk to the left plate and swap upward with the purple crystal, leaving purple on that plate. Walk around to the middle plate and face left; swap with purple again so that it moves to the middle plate and the hero returns to the left plate.
The purple crystal has been relayed from the left plate to the middle plate Enlarge image Load the left plate with pink-red
Walk to the purple crystal’s original square. Face right and swap with the pink-red crystal so that it enters the left column. Return to the left plate and swap upward with pink-red, leaving it on the left plate.
Bring orange into the plate’s column
Stand one square below the orange crystal and swap upward, bringing orange down from the top row to the second row. Walk around above to the second-row square aligned with the right plate. Face left and swap with orange to put it in that column.
Finish at the right plate
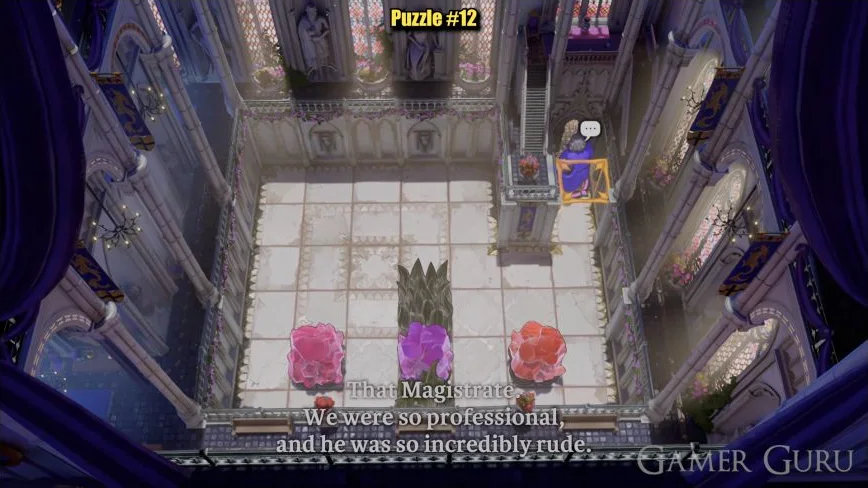
Walk to the right plate and swap upward with orange. With all three plates occupied, walk up the right edge and enter the circle.
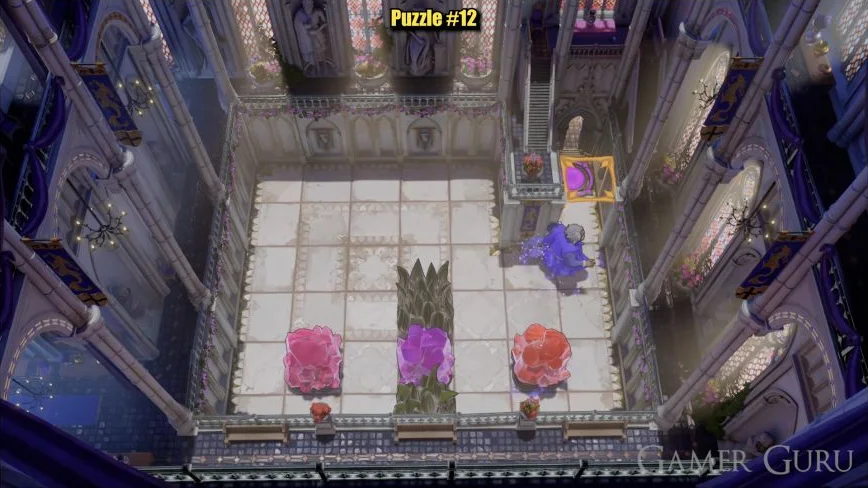
Purple, pink-red and orange crystals hold the middle, left and right plates Enlarge image
Check your result
Purple holds the middle plate, pink-red holds the left plate and orange holds the right plate; the hero reaches the upper-right circle.
If your attempt went wrong
Approach the middle plate from the side. Do not try to push a crystal onto the spikes or count an exchange animation with no changed position as a useful move.
Watch Puzzle 12 in the original recording ↗
Opens YouTube after you follow the link. No player loads here.
Puzzle 13 · Two heroes · exchange places
13. Trade sides in the divided room
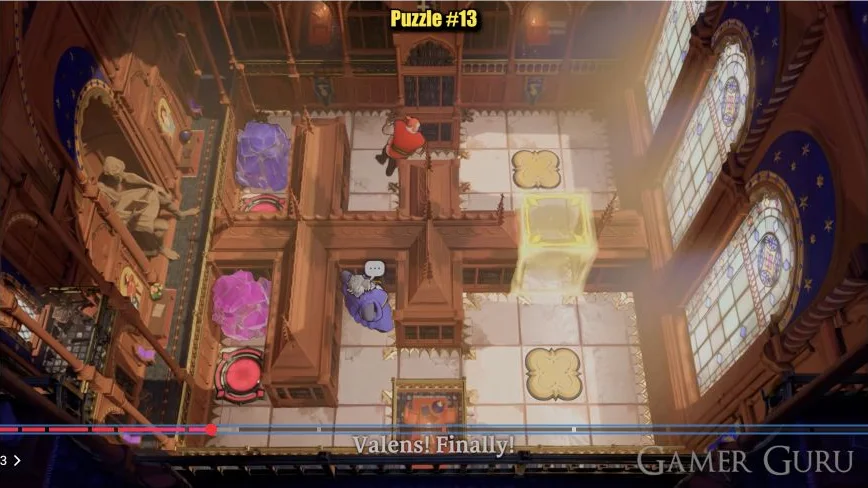
Inside a divided room, the red hero starts above and the purple-robed hero below. Two yellow flower-shaped floor tiles face each other on the right; two crystal corridors and red goal circles are on the left.
Hint 1What to notice
The yellow floor tiles provide a meeting line for the two heroes. The red circles are their destinations.
Hint 2What to set up
The heroes must exchange sides before the purple-robed hero clears the upper crystal corridor.
Hint 3The decisive move
Put red on the upper yellow tile and purple on the lower one, exchange upward, then use purple’s crystal swap in the upper-left corridor.
Full solution for Puzzle 13Moves, checkpoints and the exit
Exchange the heroes
Walk the red hero right across the upper half onto the upper yellow flower-shaped tile. Walk the purple-robed hero onto the lower yellow tile. Face up and exchange with the red hero: purple arrives in the upper half and red in the lower half.
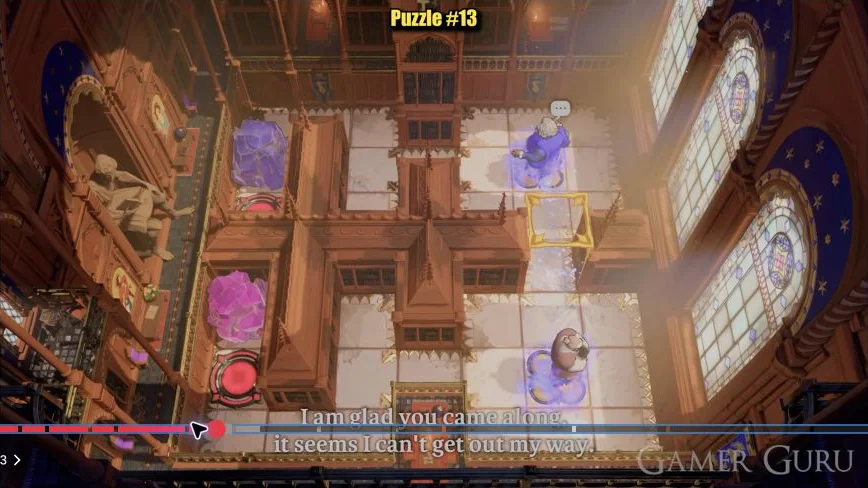
The two heroes have exchanged sides at the yellow floor tiles Enlarge image Clear the upper corridor
Use the purple-robed hero to walk around the upper half to the square directly above the blue-purple crystal at the upper left. Face down and swap with that crystal, leaving it on the upper square where the hero stood. Walk down into the red goal circle in that corridor.
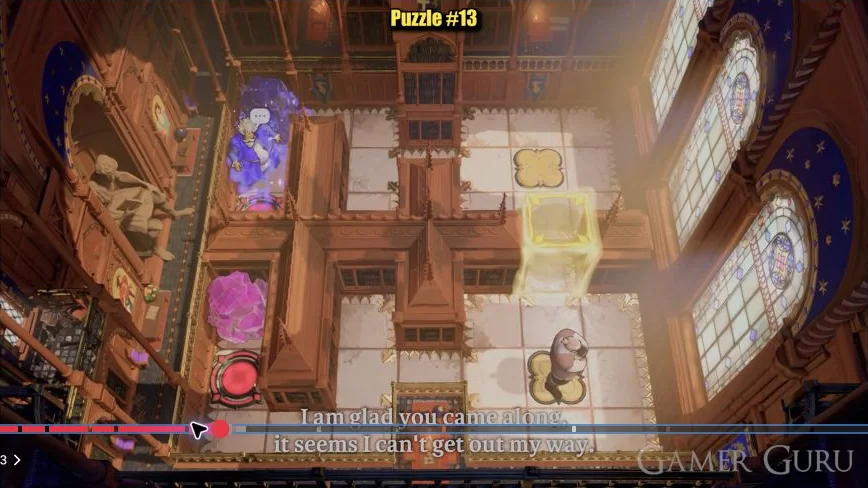
The purple-robed hero exchanges with the upper-left crystal, clearing the route down to the red circle Enlarge image Finish with red
Walk the red hero left along the lower edge of the lower half. Enter the red circle below the lower crystal. With both heroes on their separate circles, the recorded room completes.
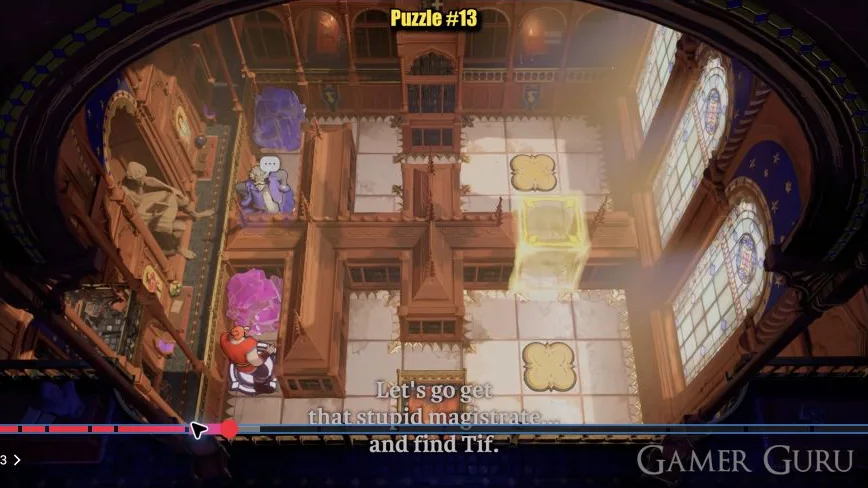
Check your result
The purple-robed hero occupies the upper corridor’s red circle and the red hero occupies the lower corridor’s red circle; the camera pulls back for the completed room.
If your attempt went wrong
The red circles are hero goals, not crystal pressure plates. If you have tried to load them with both crystals, undo those moves and first exchange the two heroes at the yellow tiles.
Watch Puzzle 13 in the original recording ↗
Opens YouTube after you follow the link. No player loads here.
Puzzle 14 · Red and green heroes · push and pull
14. Relay two crystals onto the right-hand plates
Inside a room, red starts above-left and green below-left. One blue-purple crystal blocks the central vertical passage and another is in the right-hand room. Two flower-shaped plates control two gates and their separate exit circles.
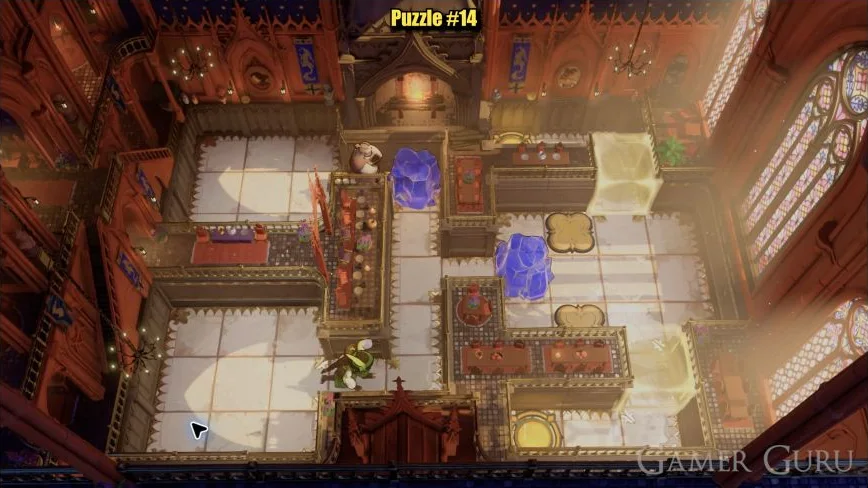
Hint 1What to notice
Green can open a walking route for red by moving the first crystal down.
Hint 2What to set up
The first crystal needs a handoff through the lower-left room before it can travel up and right.
Hint 3The decisive move
For the second plate, pull left one square, push down one square, then push left one square.
Full solution for Puzzle 14Moves, checkpoints and the exit
Clear the central passage
Use green from below the first crystal to pull it down to the lower end of the vertical passage. Red can now enter the right-hand room through the upper cross passage. Push the second crystal right against the far wall, then return red to the central passage above the first crystal. Push the first crystal down one square to the lower-left room’s side opening.
Hand the first crystal around the lower room
Stand green to the crystal’s left and pull it left into the lower-left room; let red follow out of the vertical passage. Walk green below the crystal to its right, then pull it right back to the room’s right edge. Walk green up the now-clear central passage first. Bring red to the crystal’s left and push it right into the bottom square of the vertical passage.
Pull up and into the right-hand room
Use green from above to pull the first crystal up to the middle cross passage. Move to its right and pull it right into the right-hand room. It stops below-left of the upper plate, leaving room for red to follow.
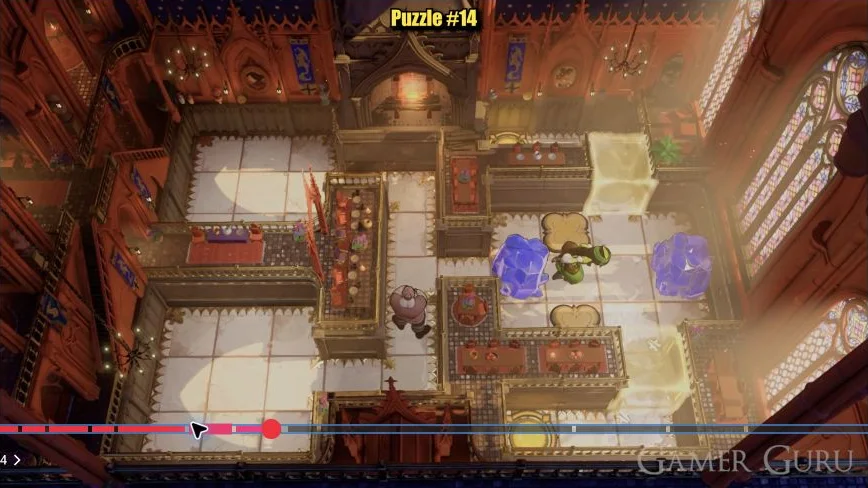
Green has pulled the first crystal through the central passage into the right-hand room Enlarge image Hold the upper plate
Bring red behind the first crystal and push it right until it is directly below the upper plate. Stand below and push it up one square onto that plate.
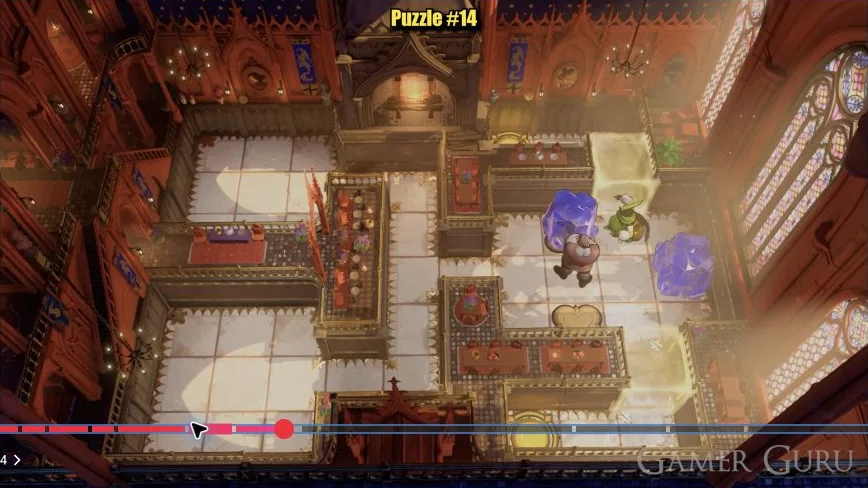
The first crystal holds the upper plate, while the lower plate is still empty Enlarge image Load the lower plate
Stand red temporarily on the lower plate. Use green from the left of the far-right crystal to pull it left one square. Move red off the plate and around the right side to get directly above that crystal; push it down one square. Walk around to its right and push it left one square onto the lower plate.
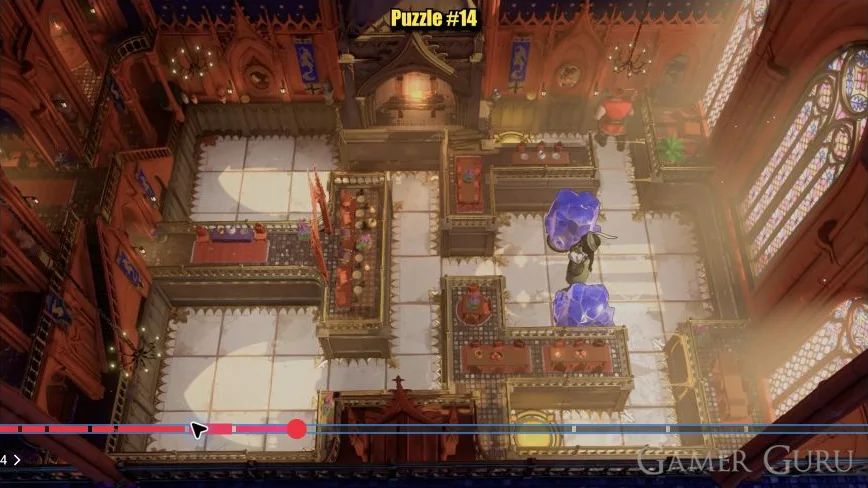
Both crystals hold their flower plates and the two gates are open Enlarge image Use both exits
Leave both crystals holding the plates. Walk red through the upper gate and left along the upper edge to the upper circle. Walk green through the lower gate and left along the lower edge to the lower circle.
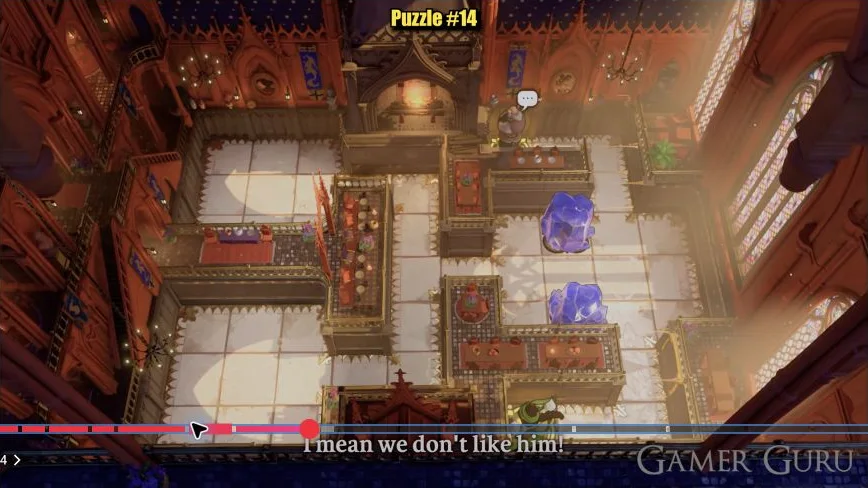
Check your result
Two crystals occupy the two flower plates, both gates remain open, and red and green reach the separate circles beyond them.
If your attempt went wrong
Do not pull the second crystal left twice. The recorded final handoff is green left once, red down once, then red left once. The upper plate alone does not keep both gates open.
Watch Puzzle 14 in the original recording ↗
Opens YouTube after you follow the link. No player loads here.
Puzzle 15 · Green and purple-robed heroes · pull and swap
15. Trade the left plate without trapping either hero
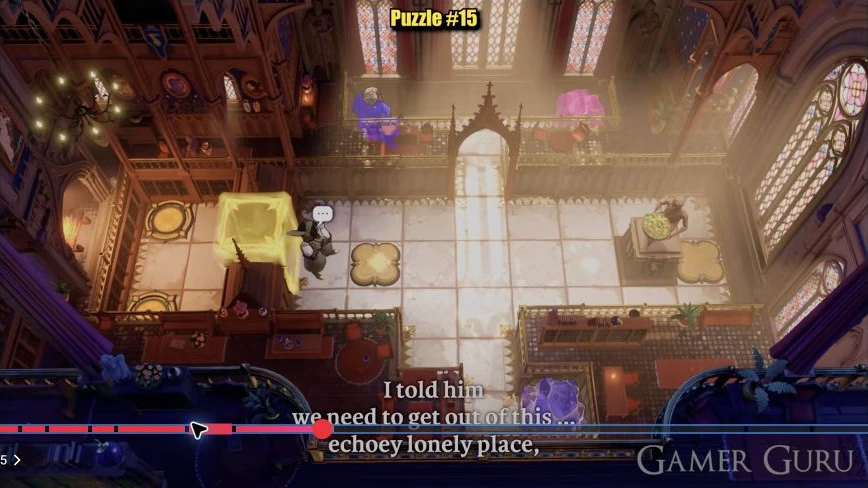
Green starts in the hall and the purple-robed hero in the upper-left corridor. A pink crystal is at the upper right and a blue crystal in the lower-right recess. Two flower plates open the left gate; two gold goal circles lie beyond it. A planter blocks the direct route to the right plate.
Hint 1What to notice
Use the upper and lower corridors to hand the crystals to green before filling the plates.
Hint 2What to set up
The pink crystal must go above the planter before green can pull it to the right plate.
Hint 3The decisive move
Opening the gate is not the finish. Send purple inside first, replace the left crystal with green, then exchange the heroes through the gate and put the crystal back.
Full solution for Puzzle 15Moves, checkpoints and the exit
Exchange above the arch
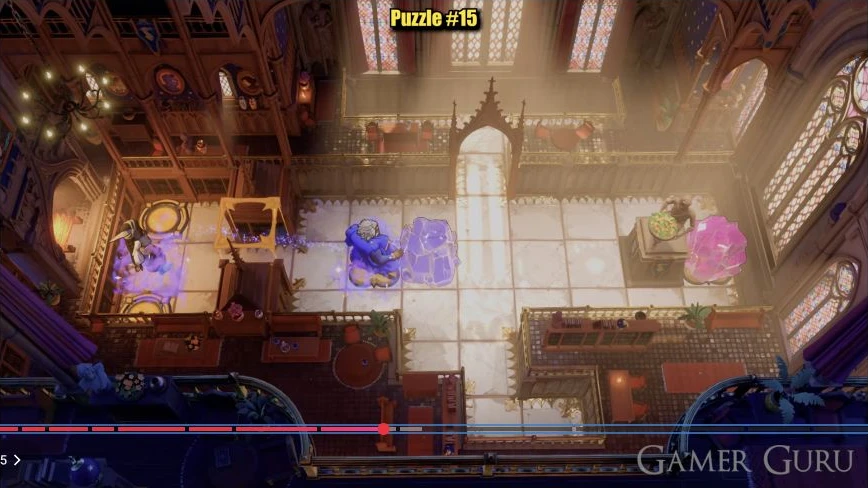
Walk green up through the central arch to the pink crystal’s left. Pull pink left one square. Move purple along the upper corridor into line with green and swap with green: purple reaches the top of the arch and green reaches the upper-left corridor.
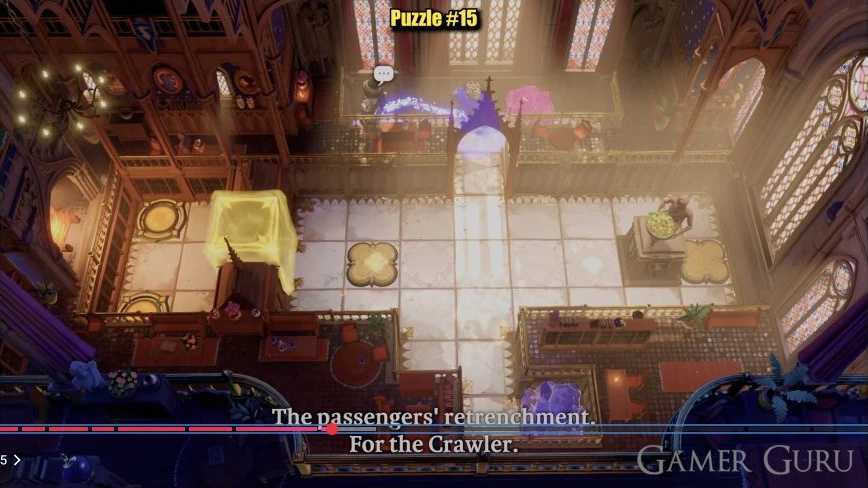
The heroes have exchanged places above the central arch so purple can reach the lower crystal Enlarge image Bring blue onto the left plate
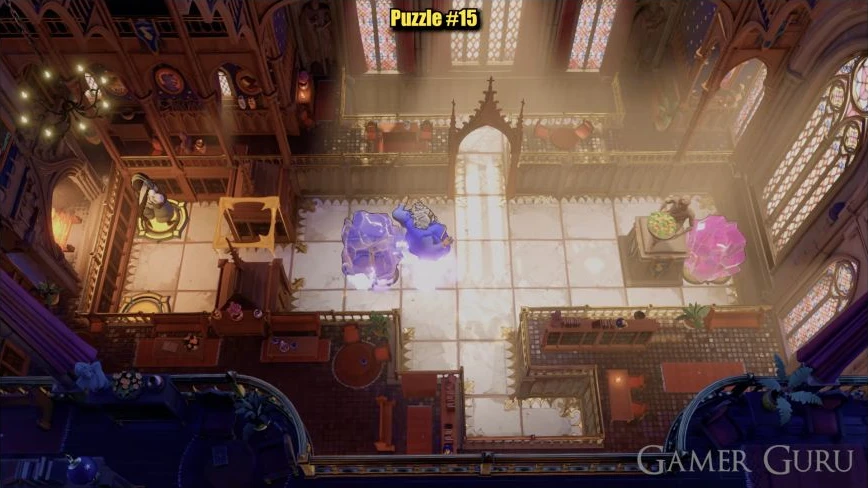
Walk purple down the central passage to the bottom and swap right with the blue crystal in the recess. Blue now occupies the bottom of the central passage. Walk green above blue and pull it up into the hall. Go around its left side and pull it left onto the left flower plate.
Bring pink into the hall
Return purple to the bottom of the central column and green to the top of the arch. Swap purple upward with green, then swap right with pink, placing pink in the central column above the arch. Bring green back up to pink’s lower side and pull it down into the hall.
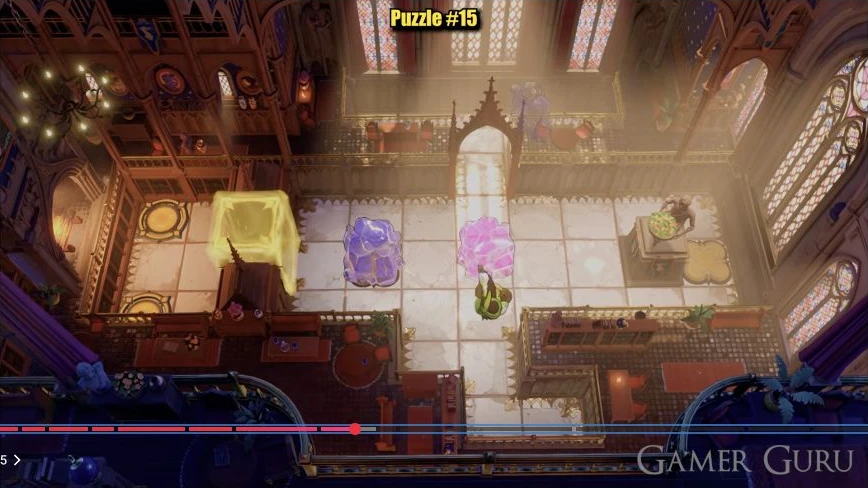
Green has pulled pink down through the central arch into the hall Enlarge image Lift pink above the planter
Walk green around to pink’s right and pull it right one square, leaving it to the planter’s left. Stand purple directly above pink and swap downward: pink moves to the row above the planter. Move green around to pink’s right and pull it right along that upper row to the far-right column. Get below it and pull it down one square onto the right plate. Both crystals now hold the plates and the left gate opens.
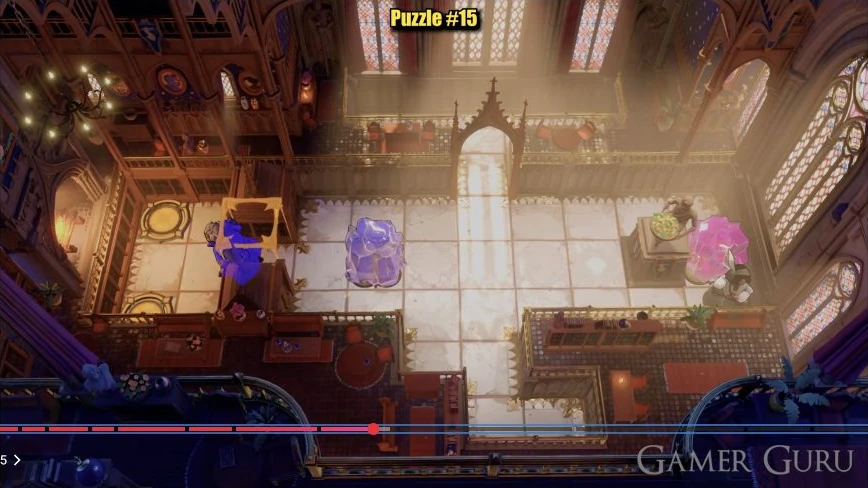
Blue holds the left plate and pink holds the right plate, opening the gate Enlarge image Exchange through the gate
Walk purple inside the left gate first. From blue’s right, use green to pull blue right one square off the left plate. Stand green on the newly empty left plate. From inside the gate, swap purple with green on that plate: green enters the gate and purple takes over holding the left plate.
Purple exchanges from inside the gate with green temporarily holding the left plate Enlarge image Restore the plate and finish
Walk green onto the upper gold goal circle. With purple still on the left plate, swap right with the adjacent blue crystal. Blue returns to the left plate and purple stands to its right. Leave both crystals holding their plates, then walk purple through the open gate to the lower gold goal circle.
Blue is back on the left plate after purple’s final crystal swap; green is already on the upper goal Enlarge image 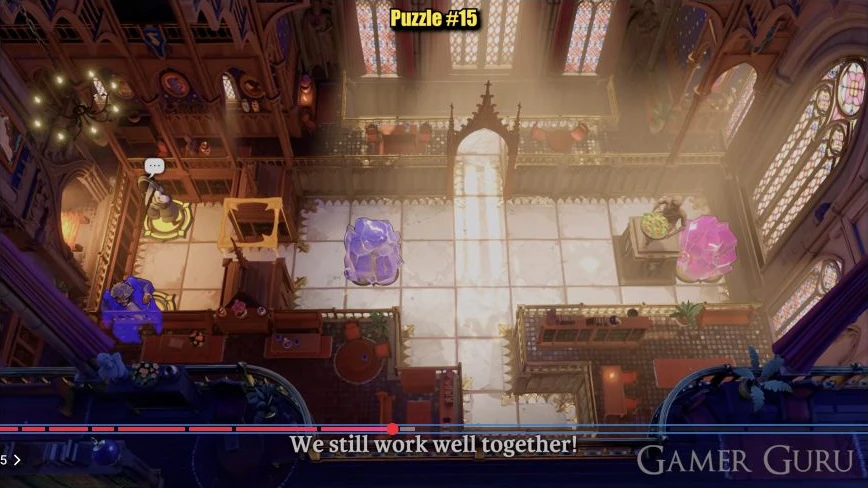
Green and purple occupy the two gold goals while both crystals remain on their flower plates Enlarge image
Check your result
Green occupies the upper gold circle and purple the lower one. Blue holds the left flower plate and pink holds the right plate; the recorded room completes.
If your attempt went wrong
Do not send both heroes toward the gate as soon as the crystals fill the plates. Purple must enter first, green must temporarily hold the left plate, and the final swap must return blue to that plate before purple leaves.
Watch Puzzle 15 in the original recording ↗
Opens YouTube after you follow the link. No player loads here.
Puzzle 16 · Red and purple-robed heroes · exchange places
16. Leave the crystal on the plate and exchange beyond the gate
Red starts at the upper end of a central passage and purple at its lower end. A yellow flower plate is in the left room. A gold gate on the right leads to two purple goal circles, one above the other; a pink crystal sits in the recess to their right.
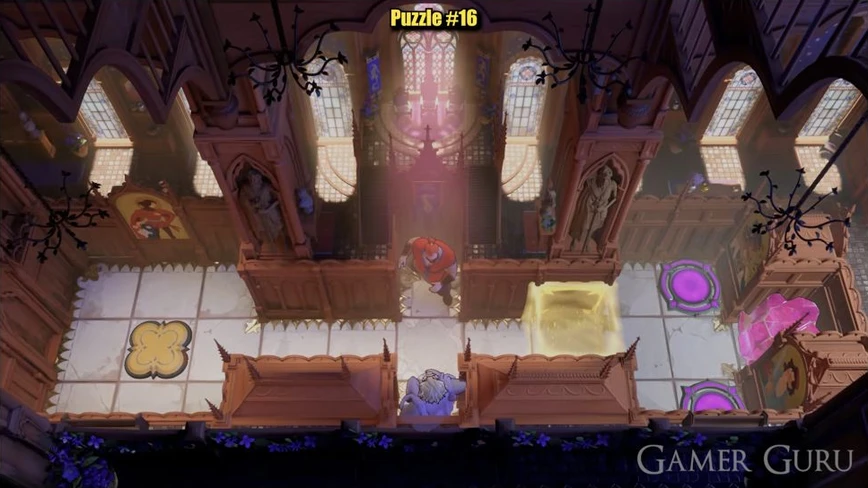
Hint 1What to notice
The purple circles are hero goals; the yellow flower tile is the crystal’s destination.
Hint 2What to set up
Purple can exchange with the far-right crystal while standing on the left plate.
Hint 3The decisive move
Once red has crossed the gate, exchange the two heroes beside the goal circles before sending them up and down.
Full solution for Puzzle 16Moves, checkpoints and the exit
Make room in the passage
Walk red down to the cross passage, left into the small room and up to its upper-right corner. This follows the recorded route and leaves the cross passage clear for purple.
Trade the plate for the crystal
Walk purple up from the lower passage and left onto the yellow plate, opening the gold gate. While still on the plate, face right and swap with the pink crystal in the far-right recess. Pink takes over the plate and keeps the gate open; purple reaches the recess.
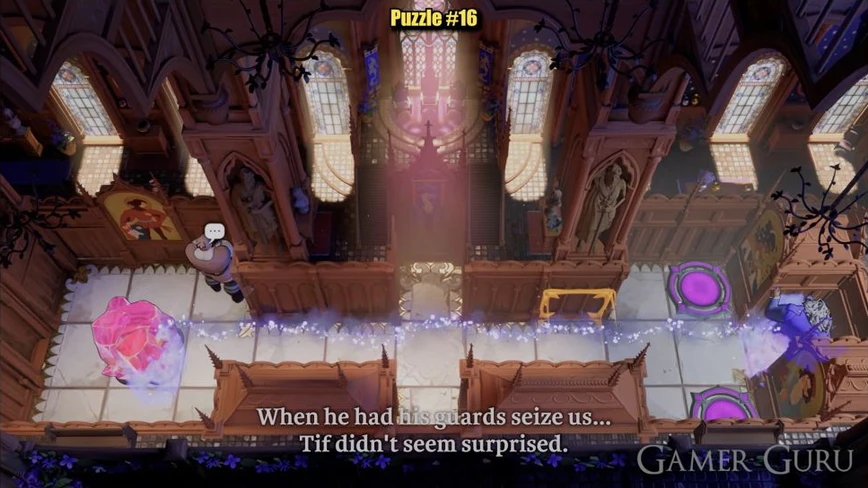
Purple exchanges from the left plate with the pink crystal, which takes over keeping the gate open Enlarge image Bring red through and exchange the heroes
Walk red back into the cross passage, right through the open gate and onto the square immediately left of purple, between the two purple circles. Face purple left and swap with red: purple moves between the circles and red moves into the right-hand recess.
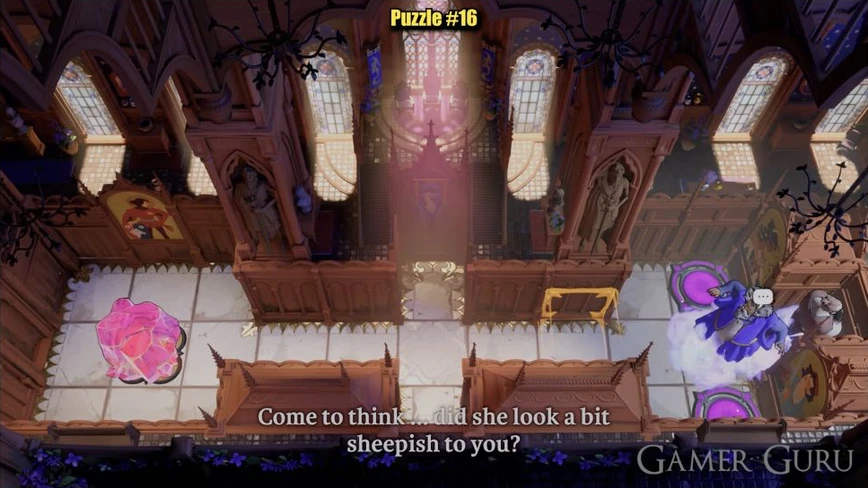
Purple exchanges left with red beside the two purple goal circles; red moves into the right recess Enlarge image Reach the two circles
Walk purple up onto the upper purple circle. Walk red left from the recess back between the circles, then down onto the lower purple circle. Leave pink on the yellow plate.
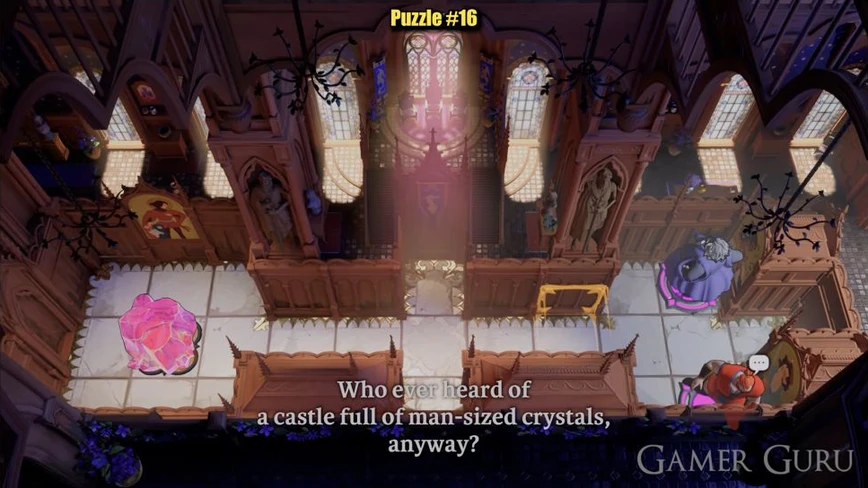
Purple and red occupy the upper and lower purple goals while pink holds the left yellow plate Enlarge image
Check your result
Purple occupies the upper purple circle and red occupies the lower one. Pink still holds the left yellow plate and the gate remains open as the view pulls back.
If your attempt went wrong
Keep the crystal on the yellow plate while the heroes finish. Red does not need to push the crystal or the other hero in this route: the move beside the circles is purple’s exchange, followed by ordinary walking.
Watch Puzzle 16 in the original recording ↗
Opens YouTube after you follow the link. No player loads here.
Puzzle 17 · Three heroes · push, pull and swap
17. Clear crystals with the two gates
An inner chamber has two pressure plates and two side gates. Three heroes work around it: a purple-robed swapper inside, a green puller near the upper-left crystal and a red pusher near the lower-right crystal. Two circles are on the top edge and a third is inside.
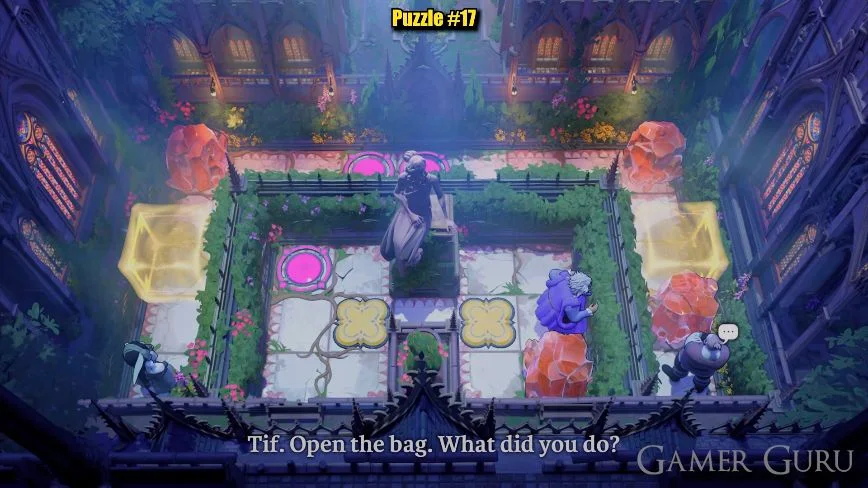
Hint 1What to notice
Two heroes can work outside while the swapping hero operates the gates.
Hint 2What to set up
The gate squares themselves are useful places to put the unwanted crystals.
Hint 3The decisive move
Open both gates, load their squares, then leave the right plate: the recorded gate closure removes those crystals. Repeat for the upper-right crystal.
Full solution for Puzzle 17Moves, checkpoints and the exit
Open both gates
Use the purple-robed hero to swap the inner crystal onto the left plate. Stand that hero on the right plate to open both gates.
Load the gate squares
Use the green hero to pull the upper-left crystal into the left gate square. Use the red hero to push the lower-right crystal into the right gate square. Keep the inner hero on the right plate until both crystals are placed.
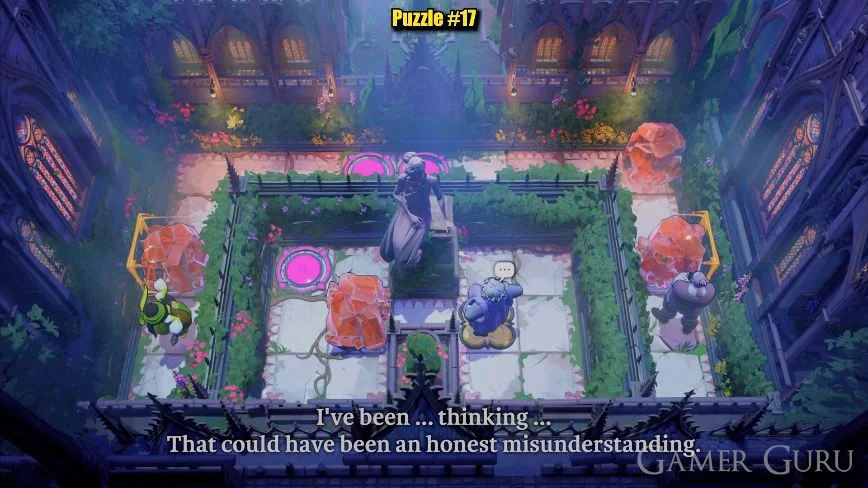
Both open gate squares contain crystals while the purple-robed hero holds the right plate Enlarge image Close the gates to clear the crystals
Move the purple-robed hero off the right plate. In this puzzle’s recorded sequence, the gates close and the crystals in those gate squares disappear. Compare the loaded and closed gate pictures before continuing.
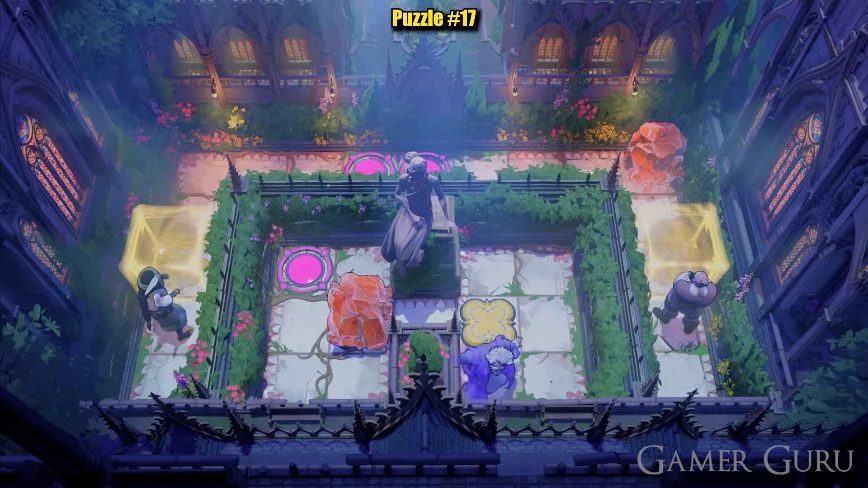
The gates have closed and the crystals that occupied their squares have disappeared Enlarge image Clear the last outer crystal
Return the purple-robed hero to the right plate to open the gates again. Use the green hero along the upper passage to pull the upper-right crystal into the left gate square. Move the purple-robed hero off the right plate again to close the gate and remove that crystal.
Place all three heroes
Move the two outside heroes onto the two top circles. Use the purple-robed hero to swap the remaining inner crystal from the left plate onto the right plate, then walk that hero onto the inner-left circle.
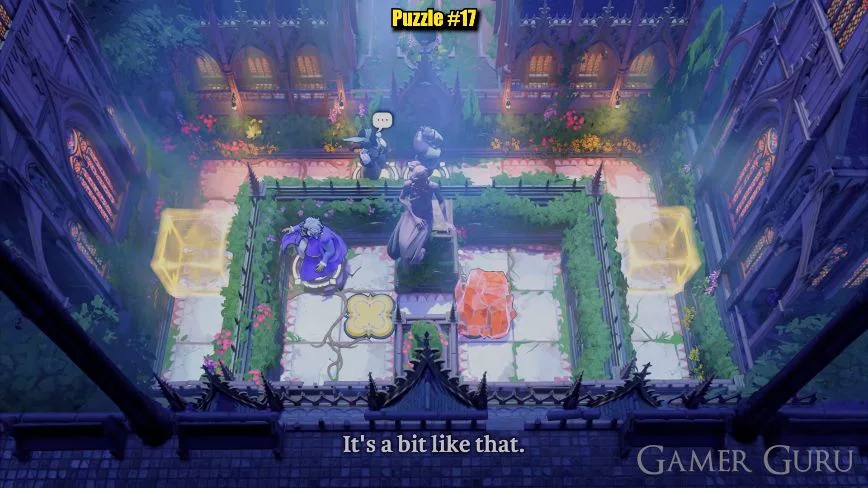
Check your result
The two outside heroes stand on the top circles and the purple-robed hero stands on the inner circle. The recorded puzzle completes with all three in place.
If your attempt went wrong
If an outer crystal remains, compare its location with the loaded-gate picture before moving the inner hero off the right plate. This route demonstrates removal in this puzzle, not a rule that every gate destroys every object.
Watch Puzzle 17 in the original recording ↗
Opens YouTube after you follow the link. No player loads here.
Puzzle 18 · Three heroes · push, pull and swap
18. Carry the outer crystal to the flower plate
A square outer walkway surrounds three blue goal circles. A yellow gate stands at the upper right of the inner area; a purple crystal starts at the upper left and a flower-shaped plate is at the lower left.
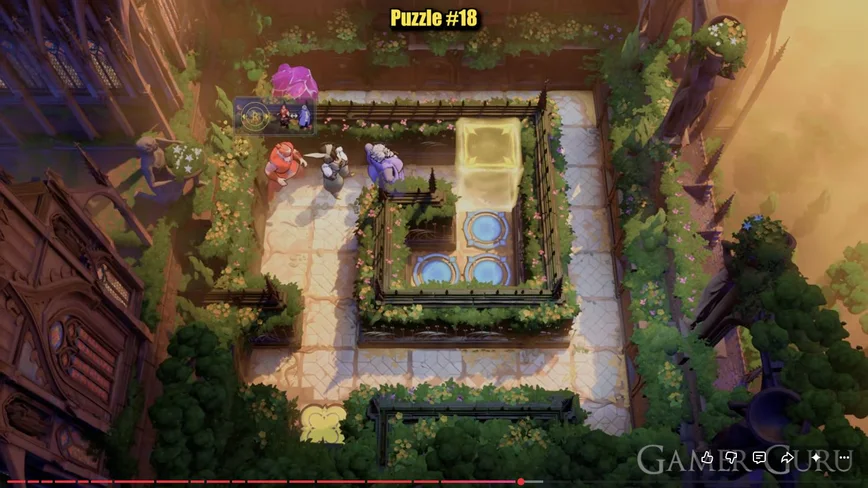
Hint 1What to notice
Bring the crystal down the right side before sending it back across the bottom.
Hint 2What to set up
The purple hero’s horizontal exchange lands the crystal above the plate, not on it.
Hint 3The decisive move
Use purple to relay the crystal across, green to pull it down, then red to make the final downward push onto the plate.
Full solution for Puzzle 18Moves, checkpoints and the exit
Exchange across the upper walkway
Walk the green hero along the lower outer edge to the lower-right corner. Walk the purple-robed hero around to the upper-right corner. Face left and swap with the crystal at the upper left: the crystal moves to the upper right, and purple arrives at the upper left.
Pull down and exchange across the bottom
Use the green hero from below the crystal to pull it down the right-hand passage to the right end of the bottom cross passage. Walk the purple-robed hero down the left side to the square directly above the flower plate. Exchange horizontally with the crystal at the right end. The crystal now sits above the plate.
Push the crystal onto the plate
Bring the red hero above the crystal. Push it down one square onto the flower plate. This final push, after the exchange, is what lowers the gate.
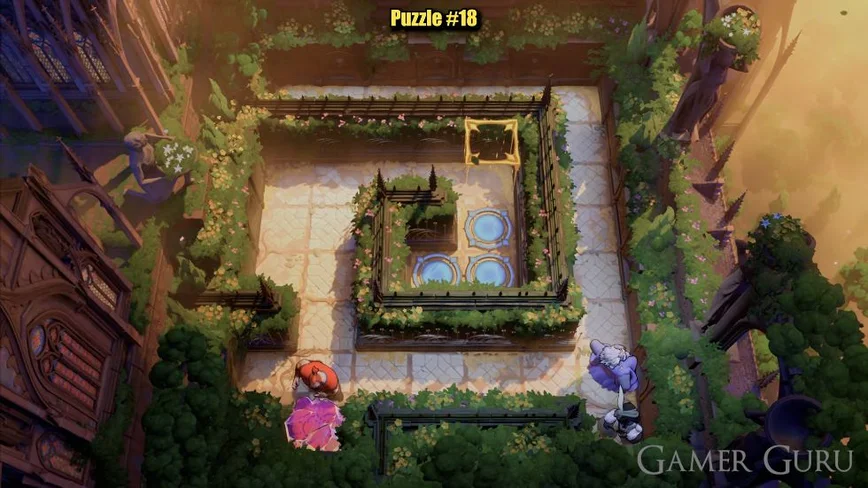
Red has pushed the crystal down onto the flower plate and the upper-right gate is open Enlarge image Place all three heroes
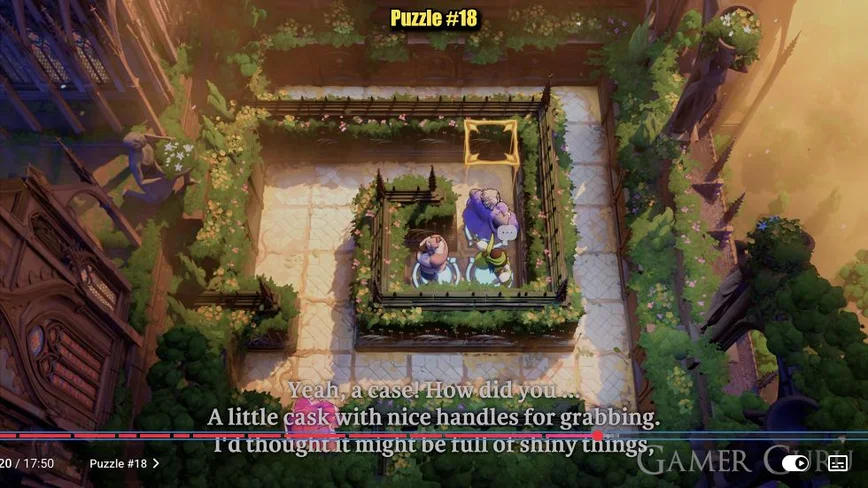
Leave the crystal on the plate. Walk the heroes up the left side into the inner upper passage, right through the open gate and down onto the blue circles. Place red on the lower-left circle, green on the lower-right circle and purple on the upper circle.
Check your result
The crystal still holds the lower-left flower plate and all three heroes occupy the blue circles inside the fence.
If your attempt went wrong
If the gate is still closed after the lower exchange, do not move heroes toward it yet: red must push the crystal down from the cross passage onto the plate.
Watch Puzzle 18 in the original recording ↗
Opens YouTube after you follow the link. No player loads here.
Puzzle 19 · Three heroes · hold plates and exchange roles
19. Keep three blue plates occupied during the handoff
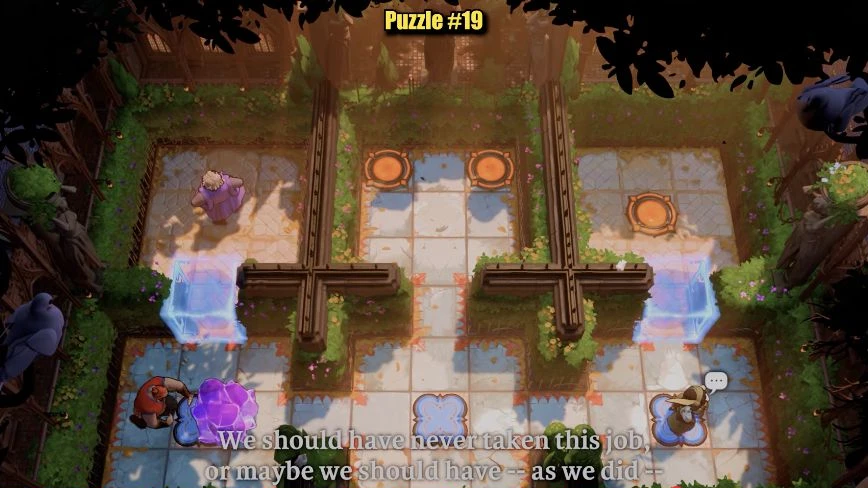
Three blue flower-shaped plates line the bottom corridor. Blue gates lead to a left room containing one purple crystal and a right room containing one orange goal circle. Two more orange goal circles are in the upper-middle room.
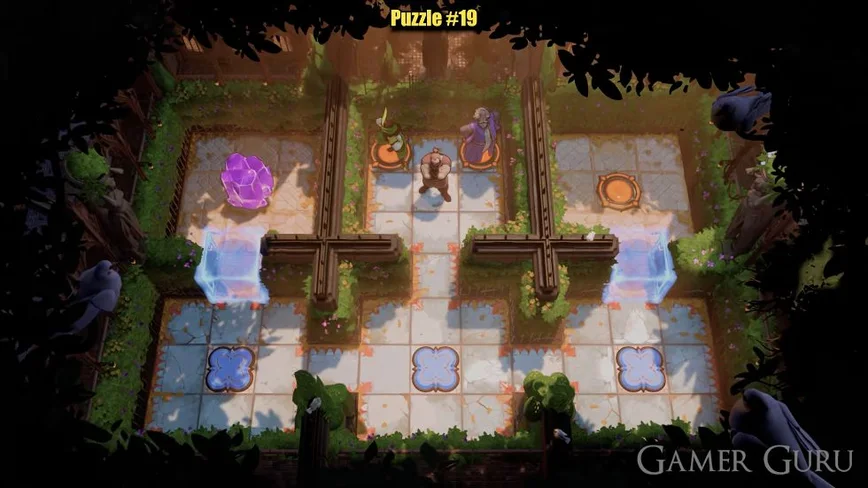
Hint 1What to notice
Here the blue flower tiles open gates; the orange circles are the heroes’ destinations.
Hint 2What to set up
Keep three things on the three blue plates while moving red into the left room.
Hint 3The decisive move
Move the crystal from the left plate to the middle plate, then exchange purple and red to keep the left plate occupied.
Full solution for Puzzle 19Moves, checkpoints and the exit
Put the heroes on the plates
Walk red onto the bottom-left blue flower plate and green onto the bottom-right plate. Walk purple down the middle passage to the middle plate, face left and exchange with red. Red now holds the middle plate and purple the left.
Trade purple for the crystal
From the left plate, face up and swap purple with the crystal in the left room. Purple enters that room and the crystal occupies the left plate. The crystal, red and green now hold all three plates, opening both blue gates.
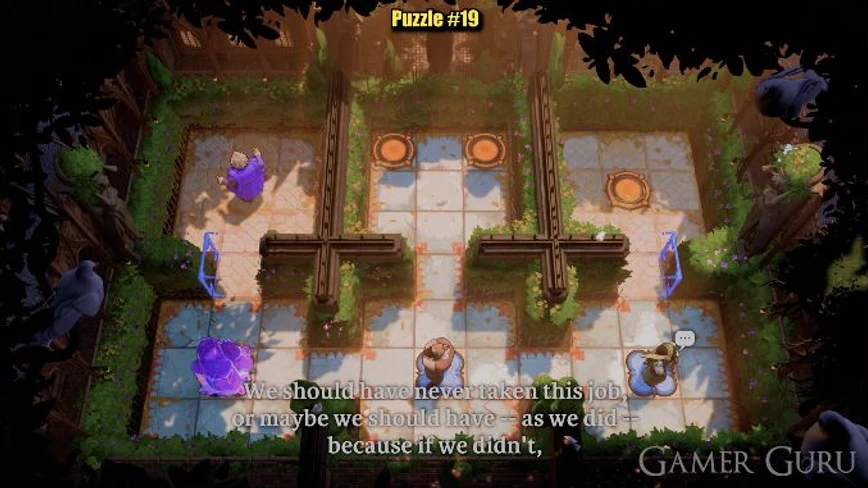
Purple has entered the left room while a crystal, red and green hold the three blue plates Enlarge image Move the crystal to the middle plate
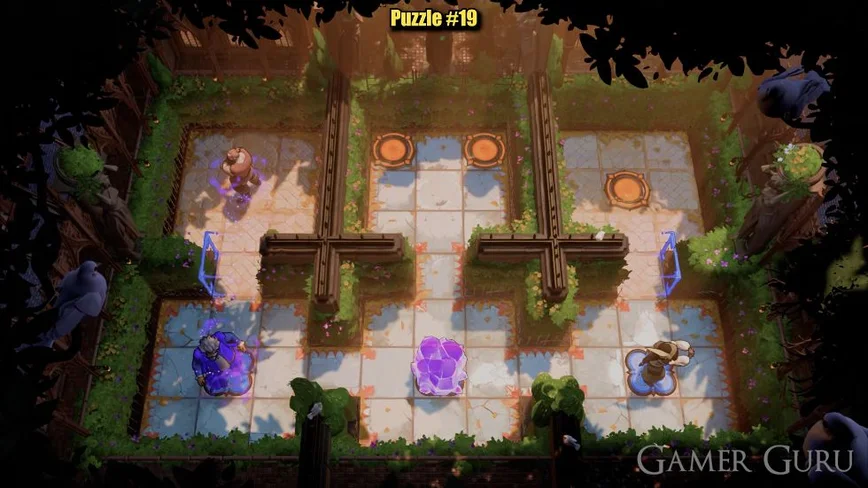
Bring red from the middle plate to the crystal’s left. Push the crystal right along the bottom corridor onto the middle blue plate, then return red to the left plate. Keep green on the right plate.
Red pushes the crystal right along the bottom corridor toward the middle blue plate Enlarge image Exchange the left-plate hero
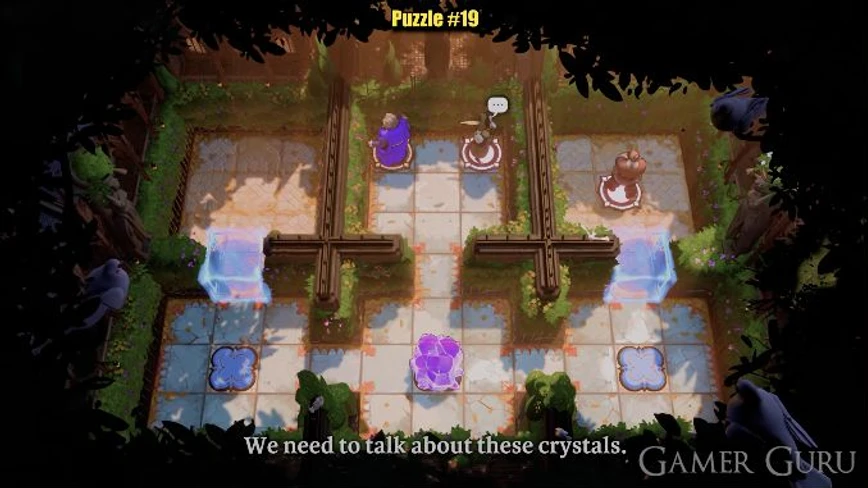
From inside the left room, face purple downward and swap with red on the left plate. Red enters the left room while purple takes over the left plate, keeping both gates open.
Purple exchanges from the left room with red on the left plate, keeping that plate occupied Enlarge image Walk red to the right-hand goal
Walk red down through the left gate, right along the bottom corridor and up through the right gate. Stand red on the orange circle in the right-hand room.
Finish in the middle room
Once red is through, move green off the right plate and up the middle passage onto the middle room’s right orange circle. Move purple from the left plate up that same passage onto the left orange circle. Leave the crystal on the middle blue plate.
Check your result
Red stands on the right room’s orange circle; green and purple stand on the two orange circles in the middle room. The crystal remains on the middle blue plate.
If your attempt went wrong
Do not confuse the blue flower plates with the orange goals. Keep green on the right plate and arrange the crystal in the middle before swapping red into the left room; red must pass both gates before the other two heroes leave their plates.
Watch Puzzle 19 in the original recording ↗
Opens YouTube after you follow the link. No player loads here.
Puzzle 20 · Three heroes · exchange through the gates
20. Trade the trapped heroes for the two crystals
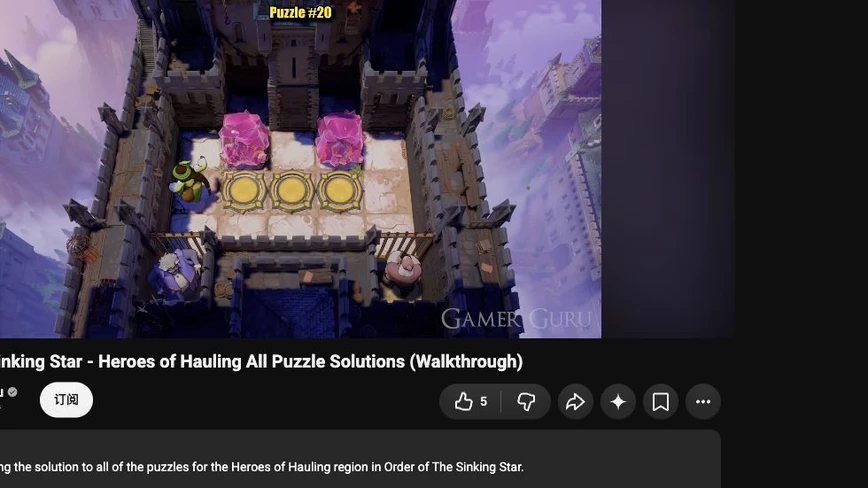
Purple starts in the main room, with green trapped in the lower-left pocket and red in the lower-right pocket behind gates. Two purple crystals occupy narrow slots along the top edge. Three gold goal circles form a row in the main room.
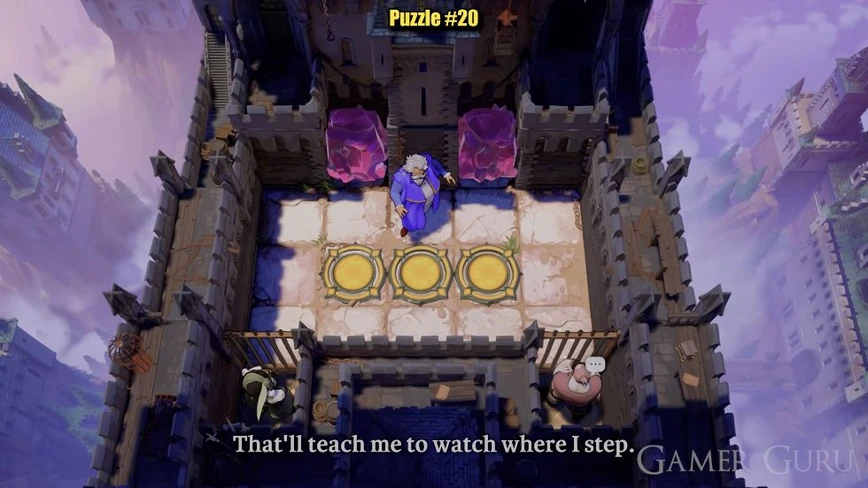
Hint 1What to notice
The recorded route exchanges characters through the gates; it does not open them.
Hint 2What to set up
Green can pull the crystals out of their top slots, then red can push them to the outer columns.
Hint 3The decisive move
After aligning a crystal above each pocket, use purple from inside that pocket to swap upward with it.
Full solution for Puzzle 20Moves, checkpoints and the exit
Free green to pull the crystals
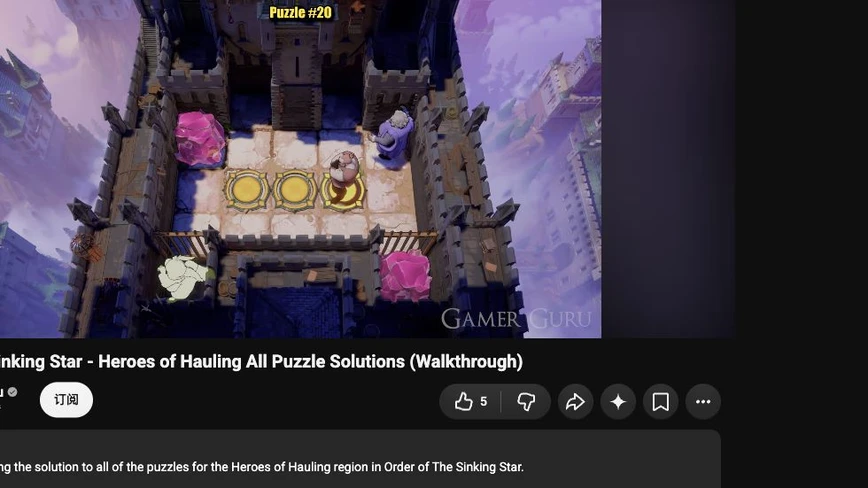
Walk purple to the main room’s leftmost column. Face down and exchange with green in the left pocket. Green enters the main room and purple enters the pocket. Use green from below each upper crystal to pull it down one square out of its narrow slot.
Green has pulled both crystals down out of their upper slots into the main room Enlarge image Free red to align the crystals
From the left pocket, swap purple upward with green to return purple to the main room. Walk purple to the rightmost column and swap downward with red in the right pocket. Use red to push the left crystal left to the far-left column and the right crystal right to the far-right column. Each crystal is now aligned above a pocket.
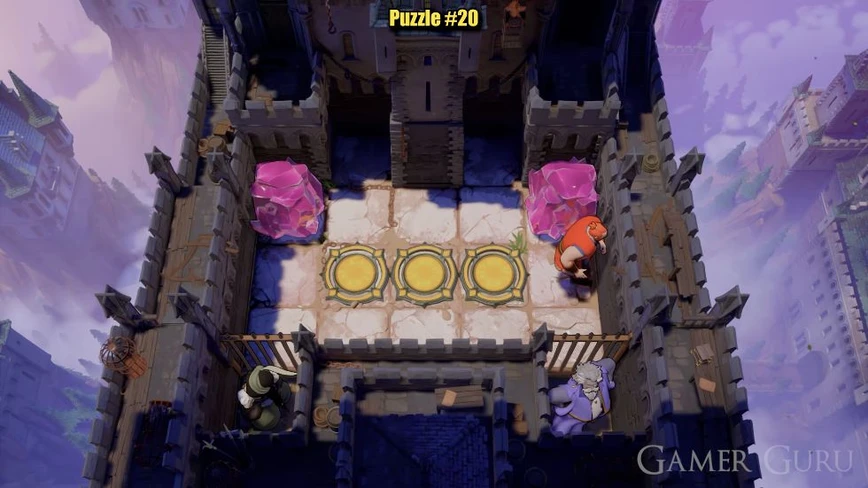
Red has pushed both crystals to the outer columns above the two lower pockets Enlarge image Trade the right pocket for its crystal
From inside the right pocket, face purple upward and swap with the right crystal. The crystal moves into the pocket and purple returns to the main room.
The right crystal is in the right pocket after purple exchanged upward from inside Enlarge image Trade the left pocket for its crystal
Walk purple to the far-left column and exchange downward with green in the left pocket. Green returns to the main room. From inside that pocket, swap purple upward with the left crystal, leaving the crystal in the pocket and freeing purple.
Place the three heroes on their goals
Walk green onto the middle gold circle, red onto the right circle and purple onto the left circle. Leave the two crystals in their separate lower pockets.
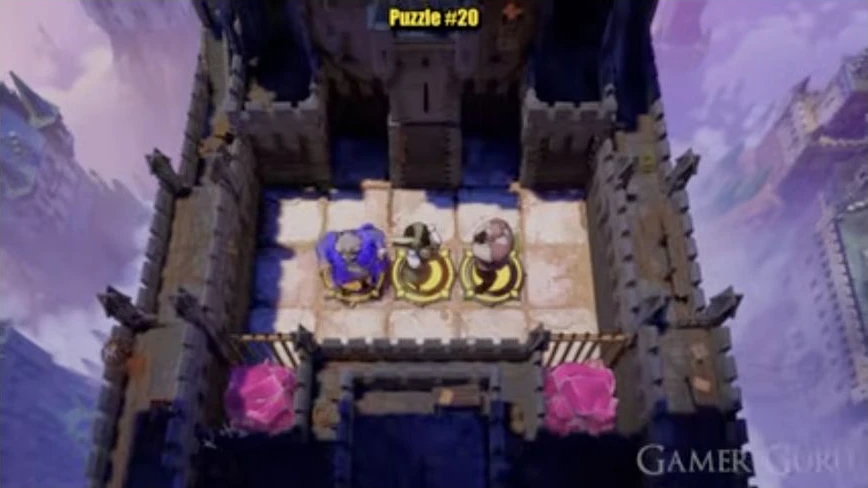
Purple, green and red occupy the left, middle and right gold circles, with both crystals in the lower pockets Enlarge image
Check your result
Purple, green and red occupy the left, middle and right gold circles respectively. Both purple crystals remain in the lower pockets and the recorded room completes.
If your attempt went wrong
Do not look for a pressure-plate move to open these gates. Use the pictured aligned exchanges through the gates, and pull both crystals out of the top slots before red pushes them to the outer columns.
Watch Puzzle 20 in the original recording ↗
Opens YouTube after you follow the link. No player loads here.
Puzzle 21 · Three heroes · replace each plate-holder
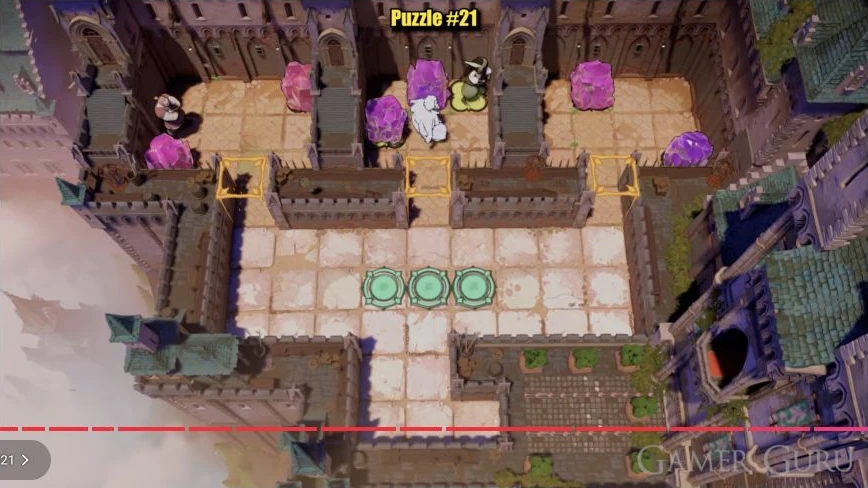
21. Replace the heroes on all six yellow plates
Three small rooms sit above a shared corridor: red starts in the left room, green in the middle and purple in the right. Each room has one crystal and two yellow flower plates. Another crystal is at the corridor’s right end and two more are at the bottom of the narrow lower passage. The three green circles in the shared corridor are hero goals.
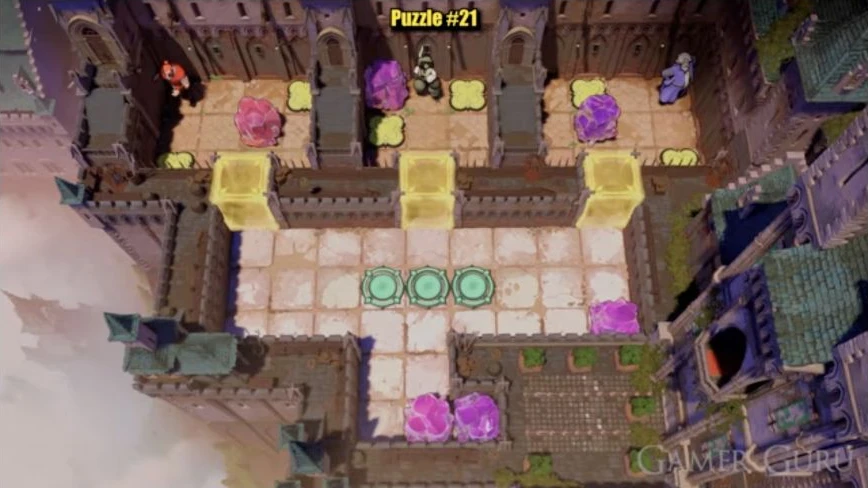
Hint 1What to notice
Use a crystal and its room’s hero to hold each pair of plates before freeing purple.
Hint 2What to set up
Purple can replace a hero on a plate, then trade with an outside crystal to leave that plate permanently occupied.
Hint 3The decisive move
Finish the left room first. In the middle room, relay the new crystal onto the left plate, then move the old crystal across the top row to the right plate.
Full solution for Puzzle 21Moves, checkpoints and the exit
Open the left and middle doors
In the left room, get red to the crystal’s left and push it right one square. Get below it and push it up one square onto the upper-right yellow plate. Stand red on the lower-left plate. In the middle room, get green below its upper-left crystal and pull it down one square onto the left-side plate. Stand green on the upper-right plate.
Free purple from the right room
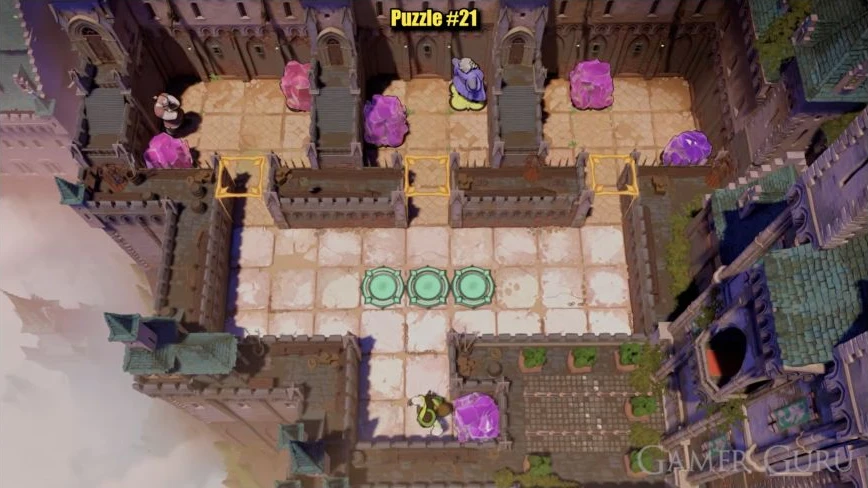
Move purple to the right end of its crystal’s row and swap left with it. Purple reaches the left side and the crystal reaches the right side. Walk purple onto the lower-right yellow plate and swap upward with that crystal, leaving it on the lower-right plate. Walk purple to the upper-left plate. With all six plates occupied, all three doors open. From that upper-left plate, swap downward with the outside crystal at the corridor’s right end. It takes over the plate and purple reaches the corridor.
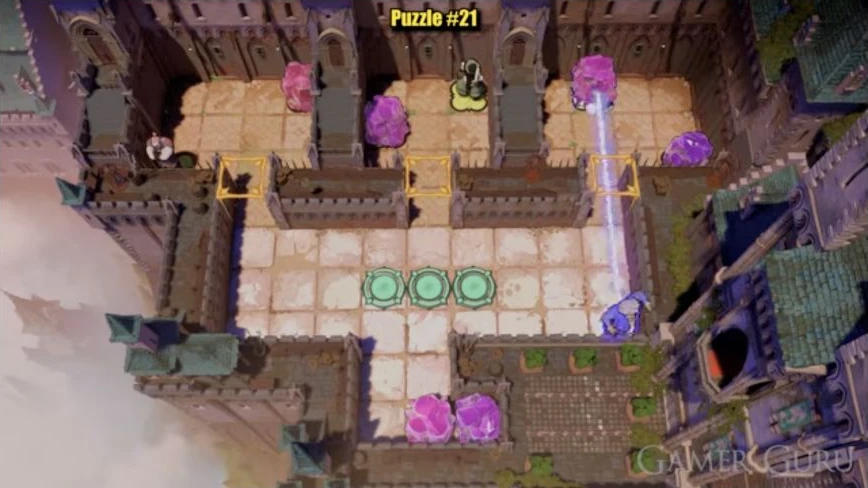
Purple exchanges downward through the right doorway so an outside crystal replaces purple on the upper-left plate Enlarge image Exchange red off the left plate
Stand purple on the middle green goal circle and swap down with the left of the two bottom crystals, bringing it onto that circle. Walk purple to the far-left end of the corridor and swap right with the crystal, putting it below the left door. Enter the left room, walk to its upper-left corner and swap down with red. Purple takes over the lower-left plate; red is free to walk out through the door.
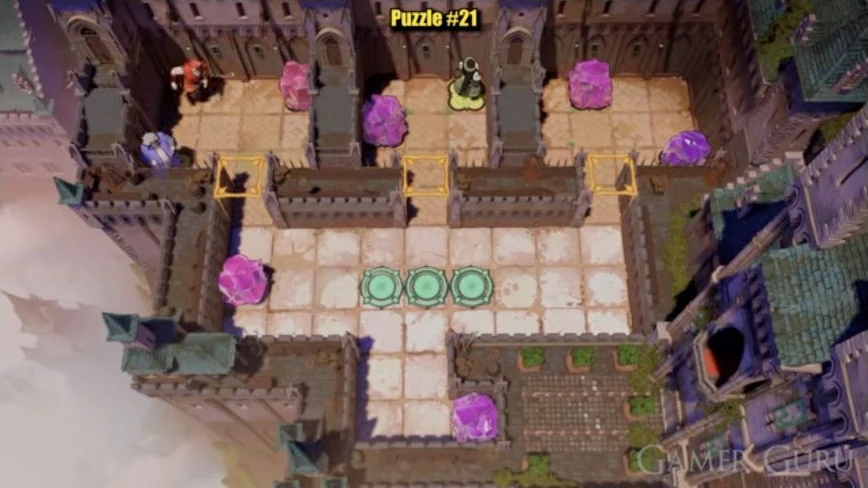
Purple takes over red’s lower-left plate, freeing red to leave the left room Enlarge image Replace purple with the outside crystal
Walk red below the crystal waiting outside the left door. Push it up through the door into the room’s middle row, then get to its right and push it left to the square directly above purple. From the lower-left plate, swap purple upward with this crystal. The crystal takes over that plate and purple is free to leave. Both left-room plates now have crystals; red can also leave the room.
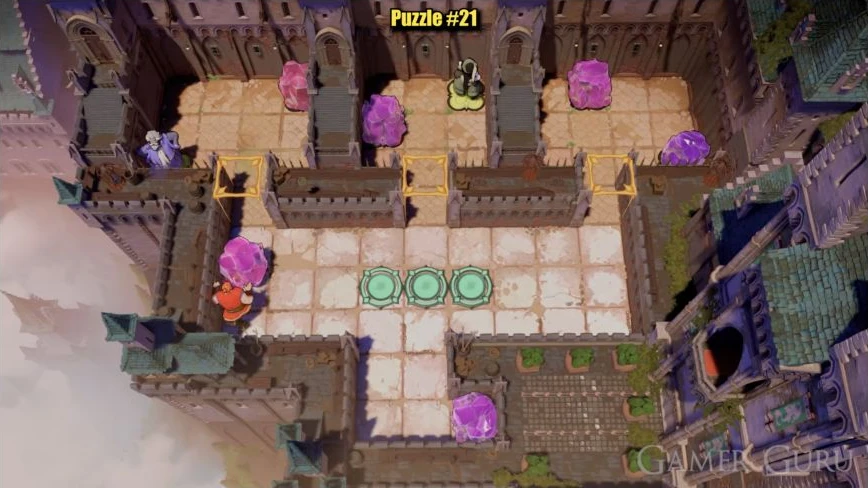
Red pushes the outside crystal upward through the left doorway while purple holds the lower-left plate Enlarge image 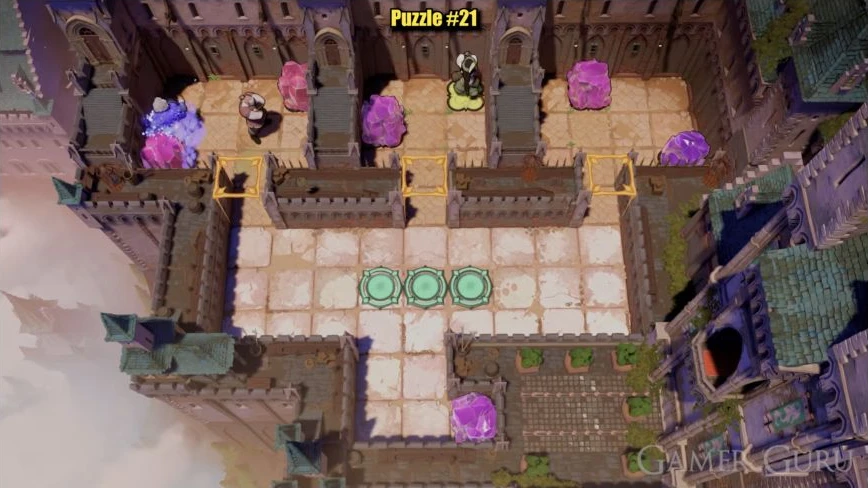
A second crystal replaces purple on the left room’s lower-left plate Enlarge image Let green retrieve the last outside crystal
Enter the middle room with purple and stand immediately below green. Swap upward so purple takes over the upper-right plate and green is free to leave. Walk green to the left side of the remaining bottom crystal and pull it left one square into the central column. Get above it and pull it up the narrow passage, across the shared corridor and through the middle door. Finish with green at the room’s top-middle square and the new crystal immediately below, at the center.
Purple holds the middle room’s upper-right plate while green retrieves the remaining outside crystal Enlarge image 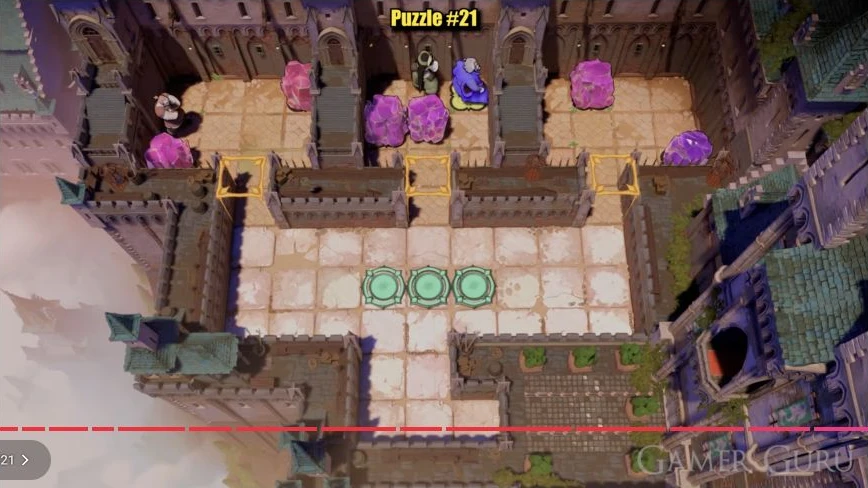
Green has pulled the new crystal into the middle room’s center, below green at top-middle Enlarge image Relay the new crystal onto the left plate
From the upper-right plate, swap purple left with green: green returns to that plate and purple reaches the top-middle square. Walk purple to the top-left square and swap down with the old crystal on the left-side plate. The old crystal moves to the top-left square and purple takes over its plate. Swap purple right with the new crystal in the center: the new crystal takes over the left-side plate and purple moves to the center.
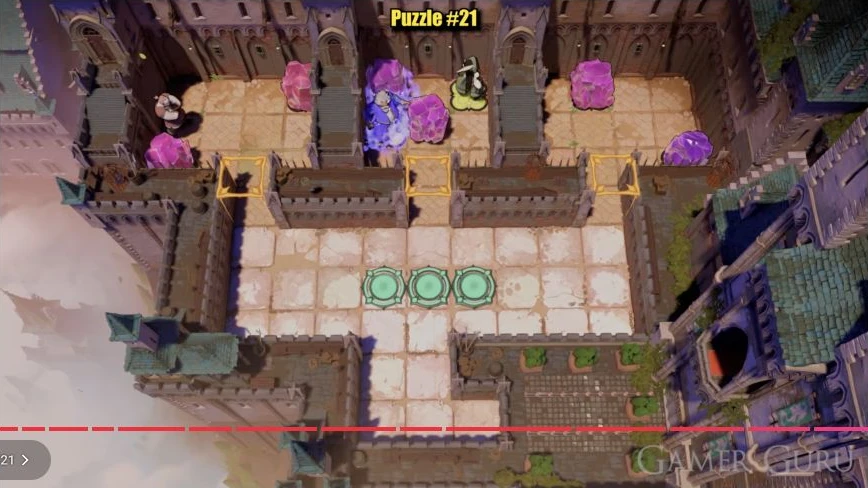
Purple swaps with the old left-plate crystal, moving it to the top-left square before relaying the new crystal Enlarge image Move the old crystal across the top
Move green off the upper-right plate and around to the top-middle square. Face left and pull the old crystal right one square, returning green to the upper-right plate and leaving the old crystal at top-middle. The three doors temporarily close while green is off the plate; this is part of the recorded route. Walk purple immediately below green and swap upward to take over the upper-right plate. Then swap purple left with the old crystal. It takes over the upper-right plate and purple reaches top-middle.
Green has pulled the old crystal into top-middle and returned to the upper-right plate Enlarge image 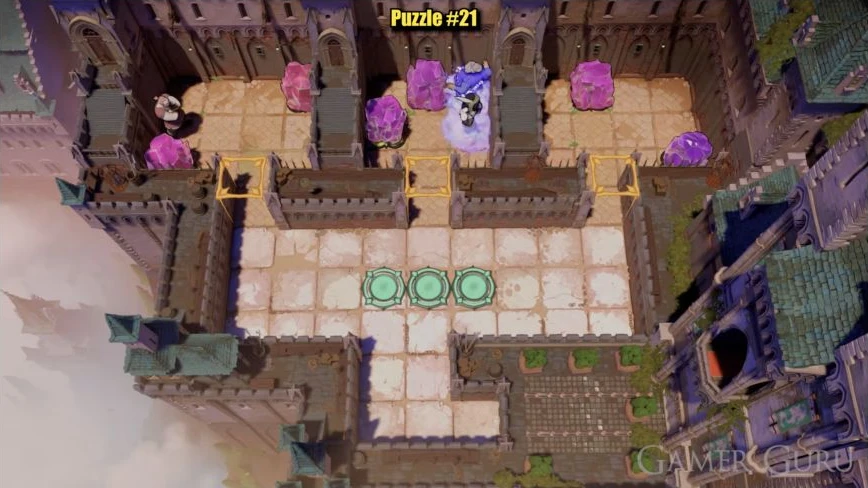
Purple exchanges upward with green to take over the upper-right plate before the final crystal exchange Enlarge image Reach the three green circles
All six yellow plates now have crystals and the doors are stably open again. Leave those crystals in place. Walk green to the left green circle, red to the middle green circle and purple to the right green circle in the shared corridor.
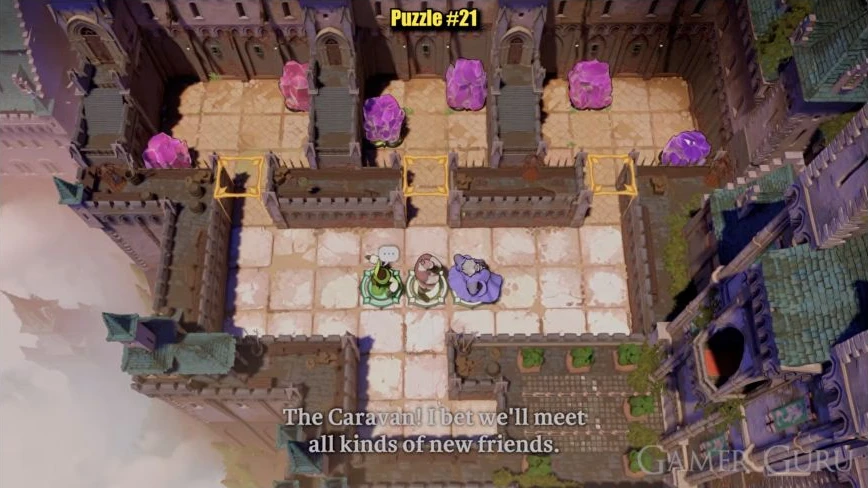
All six crystals hold yellow plates while green, red and purple occupy the left, middle and right green circles Enlarge image
Check your result
Six crystals occupy the six yellow flower plates. Green, red and purple occupy the left, middle and right green circles respectively, and the recorded room completes.
If your attempt went wrong
The yellow flowers control doors; the green circles are the heroes’ goals. If the middle-room handoff differs, compare the three pictured stages: new crystal in the center, new crystal on the left plate with the old crystal above it, then old crystal on the upper-right plate. A temporary door closure during green’s top-row pull is expected, not proof that the route failed.
Watch Puzzle 21 in the original recording ↗
Opens YouTube after you follow the link. No player loads here.
Puzzle 22 · Six companions · one goal each
22. Bring all six companions onto the central circles
Six gold circles sit on the bright central floor. Pink crystals border the north, blue crystals and two companions the east, green crystals and a red dragon the west, and orange crystals the south. Start with the red-clad hero selected at the south edge, exactly as pictured; the dragon is not one of the six companions to place.
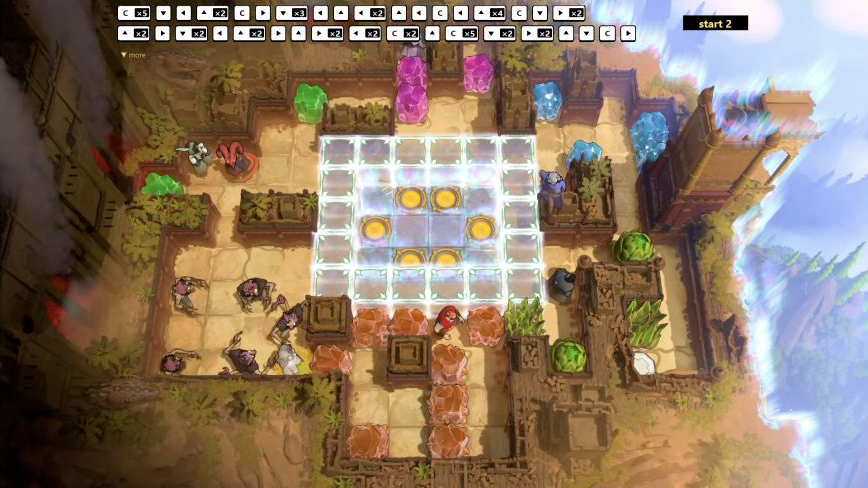
Hint 1What to notice
Six gold circles are destinations for the six companions, not for crystals or the dragon.
Hint 2What to set up
Work on the surrounding formation before trying to occupy the circles. The intermediate picture in the full route shows the changed northern crystals while all six circles are still empty.
Hint 3The decisive move
From the untouched board with the south red-clad hero selected, change character five times to select the east-lower black hood. Press Down, Left, then Up twice. Continue from that state with the full route’s next block.
Full solution for Puzzle 22Moves, checkpoints and the exit
Set the starting character and controls
Begin from the pictured untouched formation with the south red-clad hero selected. In this recording, C changes character; if you changed that binding or use a controller, use your current change-character control instead. Up, down, left and right refer to the picture. Each arrow is one press, not a command to walk until blocked. A multiplier repeats that press. Follow every C in order, including consecutive switches, and do not add clicks or extra switches between blocks. Input ranges count both C and direction presses.
Inputs 1–9 · select the east-lower companion
C ×5; Down; Left; Up ×2. After the five switches, the recording selects the black-hooded companion at the lower east side; continue with the four direction presses.
Inputs 10–20 · the next directional block
C; Right; Down ×3; Left; Up; Left ×2; Up; Left.
Inputs 21–26 · move left, then upward
C; Left; Up ×4.
Inputs 27–30 · turn downward and right
C; Down; Right ×2.
Inputs 31–44 · continue with the same companion
Up ×2; Right; Down ×2; Left; Up ×2; Right; Up; Right ×2; Left ×2. Do not switch characters at the start of this block.
Inputs 45–47 · two switches and one move
C ×2; Up.
Inputs 48–52 · compare the northern checkpoint
C ×5. Stop before the next direction to compare the picture: the northern black-hatted figure is highlighted, the green-clad hero is above the northwest green crystal, and the blue/purple hero is at the northeast. The northern pink-crystal arrangement has changed; all six central circles are still empty. This is the recording’s 52/178 checkpoint.
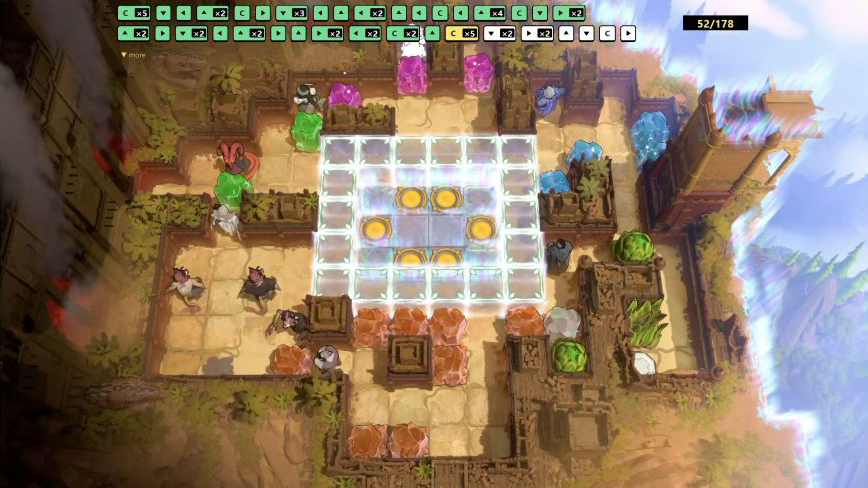
At input 52 the north black hat is highlighted, green is above the northwest crystal and the central circles remain empty Enlarge image Inputs 53–58 · finish that block
Down ×2; Right ×2; Up; Down. Continue from the checkpoint without an extra character switch.
Inputs 59–67 · alternate around the route
C; Right; Down; Left; Up; Right; Down; Left; Down.
Inputs 68–70 · two right presses
C; Right ×2.
Inputs 71–81 · five switches, then six directions
C ×5; Down; Right; Down ×3; Left.
Inputs 82–87 · across and down
C; Right ×2; Down ×2; Left.
Inputs 88–93 · five switches and one up press
C ×5; Up.
Inputs 94–105 · the seven-left sequence
C; Up ×2; Left ×7; Up; Left. Count the seven left presses; do not replace them with a held direction.
Inputs 106–120 · the next seven-left sequence
C ×5; Right; Up ×2; Left ×7.
Inputs 121–152 · keep this long block together
C ×2; Right; Down; Right ×3; Up ×7; Left ×2; Up ×2; Right; Down; Left; Down; Right ×4; Left ×3; Down ×3. There are no further character switches inside this block.
Inputs 153–165 · the penultimate approach
C ×2; Right ×4; Left; Down; Right; Down ×3; Right.
Inputs 166–178 · finish the six-person formation
C ×5; Down; Right ×3; Up ×2; Right ×2. Compare the final picture: each of the six circles is occupied, the recording reads Done 178, and the game begins dialogue.
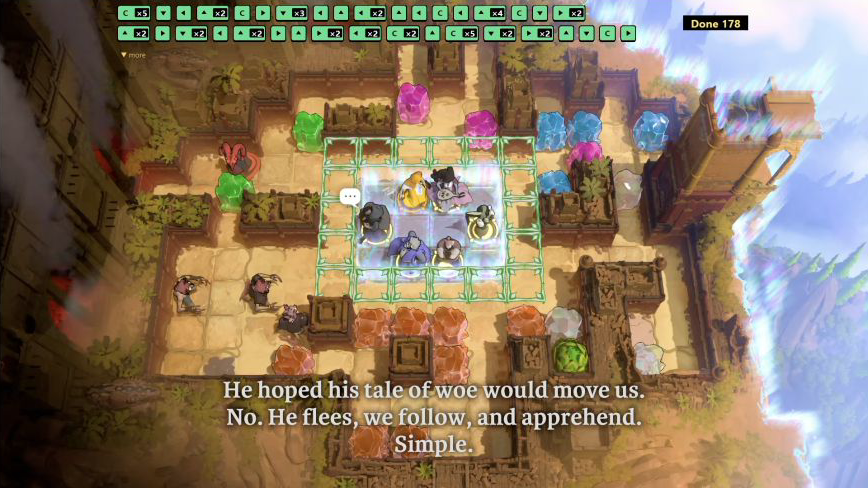
Done 178: six companions occupy all six illuminated goal circles and dialogue begins Enlarge image
Check your result
All six central circles are occupied: the pale/gold-highlighted figure is top-left, the black hat top-right, the black hood left, green right, blue/purple bottom-left and the red hero (pale while unselected) bottom-right. The dragon remains outside the goals. This is the ending of the linked 178-input recording, not a different creator’s formation.
If your attempt went wrong
If the 52/178 checkpoint does not match, stop rather than continuing with the wrong formation. Check the initial south red selection, every C press and the single-press direction counts. Undo your mistaken inputs to a matching earlier state, or return to the original puzzle state before replaying the route. Do not jump into a later block from a partly solved board or assume a fixed six-character switching cycle. If Reset itself is failing, use the site’s separate dated Undo/Reset workaround; it is not a guarantee of recovery.
Watch Puzzle 22 in the original recording ↗
Opens YouTube after you follow the link. No player loads here.
Looking for a different region?
South-world stones, lily pads and sailors →
About these routes
Puzzles 1–21 are based on Gamer Guru’s October 8, 2026 recording of The Hearty Heroes of Hauling. Puzzle 22 uses Game Guides Channel’s October 12 final-puzzle recording, for the starting selection and pictured checkpoints, together with Olatunde-Bada’s October 14 written input route on GamerHour. The full 178 inputs come from that text; the video supplies the initial red selection, matching visible first 60 inputs and Done 178 ending. They belong to the same source chain, not two independent playtests. These are explanations of the recorded layouts, not personal tests on the current game build. The exact patch shown is unknown. If your layout or hero differs, compare the pictures before using a route.
Crystal names here describe their pictured colors. The numbered sequence belongs to the creator, not the game’s official level IDs. This page covers the 22 pictured Hauling puzzles, not every North-world or whole-game puzzle. Hints and explanations by Sinking Star Hub. About this guide and corrections.